The iBoost kicks in when it detects excess electricity being fed back to the grid, but there are other situations when I might want to divert power to the immersion heater- for example, when electricity is cheap/free or in some instances I’m even being paid to consume.
I hunted for an off the shelf solution and came up short. The only potential contender was the myenergi eddi, but even that doesn’t seem to clearly document what it can/can’t do (and how well it integrates with Home Assistant)- oh and it’s probably £500+.
So what were my requirements?
WiFi / network connected.
Reports power consumption.
Can limit power output.
Can integrate with Home Assistant.
A simple Sonoff POW is network connected, reports power consumption and integrates well with Home Assistant (natively or by flashing with ESPHome or Tasmota). Great, 3 of the 4 requirements nailed, so how can we achieve the 4th?
A lot of research turned up something called a solid state relay (or contactor). I don’t pretend to fully understand, but loosely speaking it allows you to vary output by varying (an isolated) input. In this instance, the output is 240V AC and the input is 3V DC (which we can feed directly from the Sonoff).
There are different types of SSR/contactor which can be controlled by modifying the input in different ways, but the one I chose uses pulse width modulation (PWM). I picked a (deliberately over-specced) SSR from Amazon: 40A SSR-40DA DC-AC,Input 3-32VDC,Output 24-380VAC, suitable heatsink, and an enclosure to house them (along with the Sonoff).
Configure GPIO3 as PWM (via the Tasmota web interface, configuration, configure template).
Connect the Sonoff (GND from the header used to flash the firmware) to the SSR (- DC input).
Connect the Sonoff (RX from the header used to flash the firmware) to the SSR (+ DC input).
Cut the extension lead in half.
Connect the live and neutral from the “plug end” to Sonoff inputs.
Connect the live output from the Sonoff to either AC terminal of the SSR.
Connect the remaining AC terminal from the SSR to the “socket end”.
Connect the neutral output from the Sonoff to the “socket end”.
Connect earth from the “plug end” to the “socket end” (if you’re careful, you could possibly avoid cutting this in the first place.
Fit it all neatly int he enclosure (I used a few cable ties and some hot glue to ensure there would be no strain on any of the cables and no danger of movement).
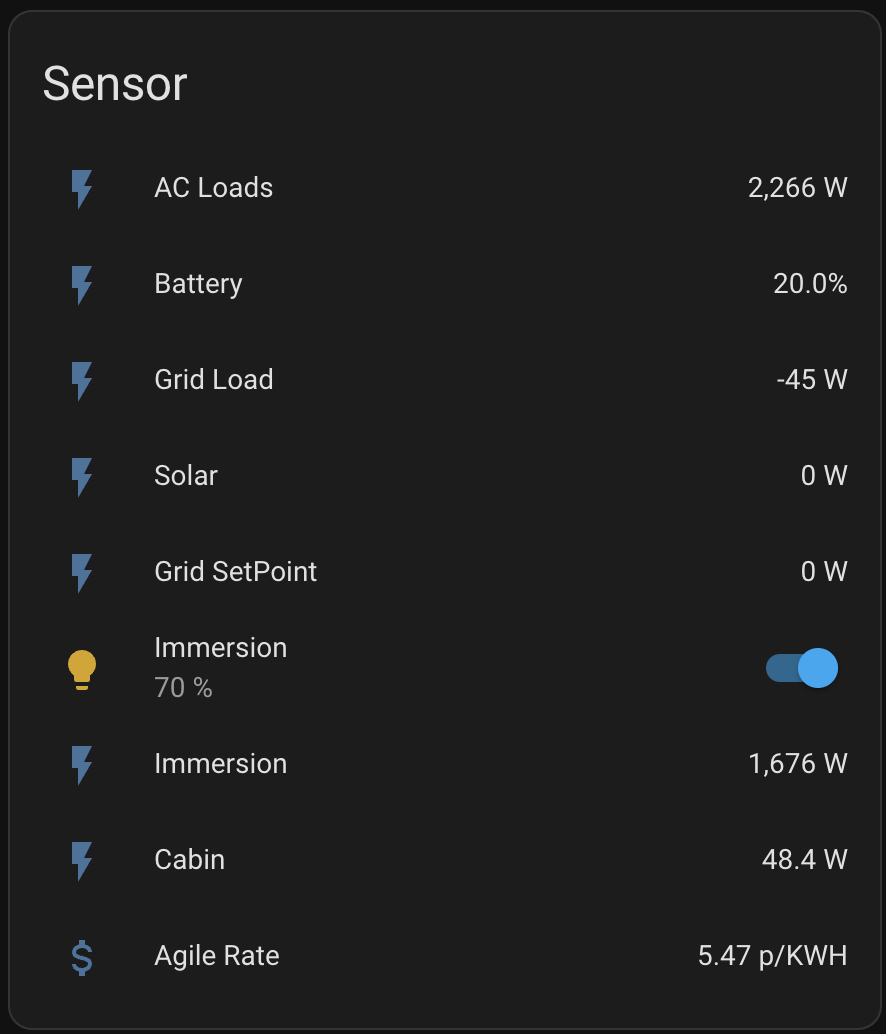
Now after adding the Tasmota device to Home Assistant I can see the state and power consumption (alongside some data from my Victron inverter and the current electricity price):
It’d be nice if I could somehow get a temperature probe into the hot water tank, and maybe a read from the SSR heatsink too (I have capped it at 70% for now as it does heat up)- but that’s for another day!
I have some automations setup to turn the immersion heater on when the electricity price is 0 or less or when the batteries reach a certain level of charge.
Total parts cost probably less than £50, so 10x less than the eddi (which may not have been capable of doing what I wanted).
Big shout out to Rich who reached out to give me some pointers when I was struggling with my search- thanks!
7 years ago, in our old house, we had a solar setup where we were paid for all electricity generated by our solar PV array. And for electricity we exported (generated, but didn’t use) we were paid double.
In our new house, unfortunately we do not get paid for generation or export. We only benefit from the electricity we generate and consume. This leaves us frustrated on a day where we generate electricity during the day, but use very little, then come home and consume a lot from the grid.
Since the Tesla Powerwall was released, i’ve been interested, but until now, I’ve not felt the return on investment was there.
I’m a keen DIY’er and a convenient Facebook ad, or perhaps while browser eBay, I stumbled across something like a PowMr 10KW Power-Wall. I was close to pulling the trigger, but needed to do a bit more research first…
Lucky I did- as upon further investigation, it became more obvious this was just a battery. It definitely wouldn’t be plug and play (at minimum, some sort of inverter would be needed too).
The more I read, the more I realised I needed to do plan thoroughly before making a purchase. One of things that seems especially unclear with all products- do they support two way/bi-directional power on the AC-Input?
Every wiring diagram seemed to show “AC Loads” connected to a dedicated output. I was starting to think I would need a separate consumer unit, and the inverter wouldn’t be able to cope if I wanted to boil the kettle and use the oven at the same time?
A lot of the questions and information I was searching for took me to the Victron community forum: https://community.victronenergy.com/index.html. Victron seemed like a solid bet for my equipment, now I needed a supplier and ideally an expert.
I was in luck- https://essandsolarsolutions.co.uk/ not only stock the Victron equipment, have an extremely clued up Victron consultant (Etienne), offer bundles/packages (which contain almost everything you need), but better yet, they’re based in Essex, close enough for me to sit down and talk things through!
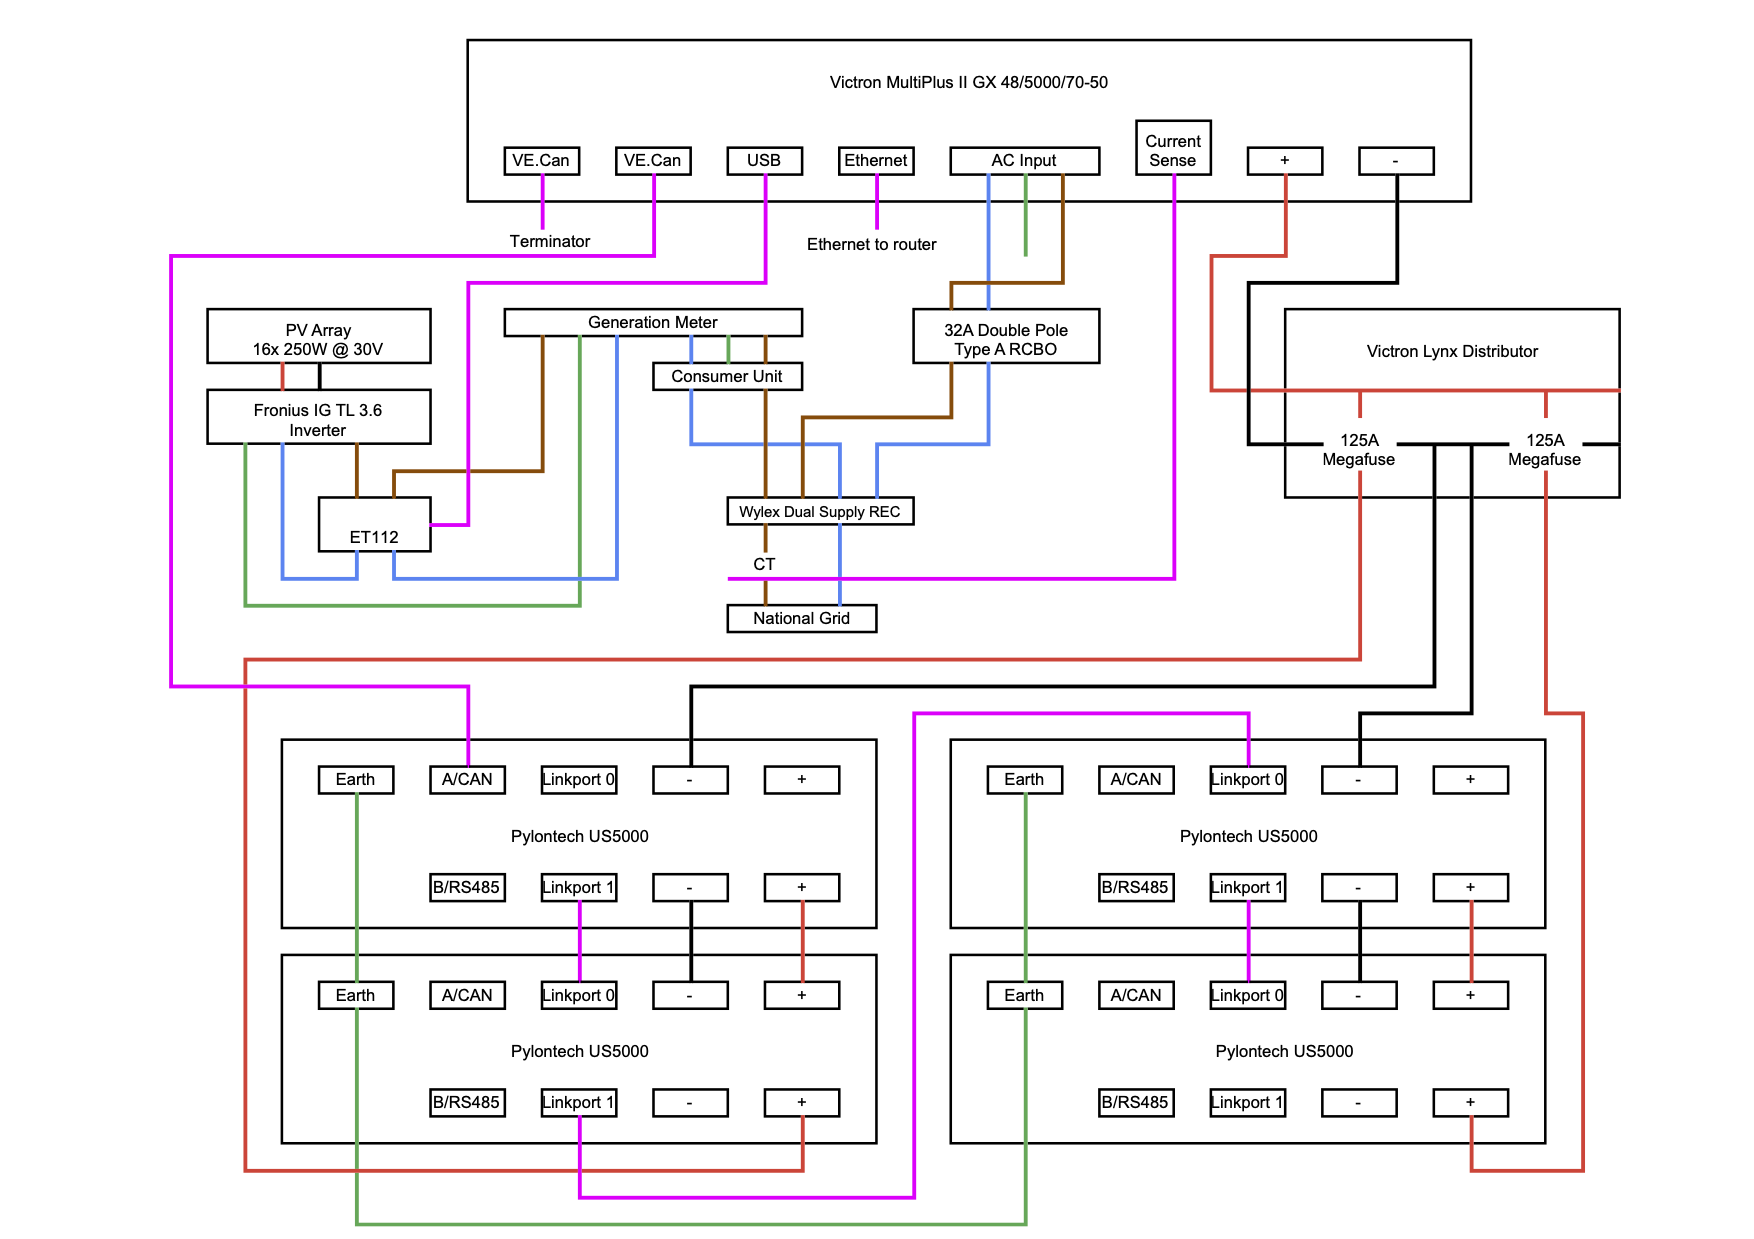
After talking it through, and putting down what I needed on paper- I was ready to order. Here’s what I ended up with:
Parts (not available from ESS and Solar Solutions):
Current Transformer 100A:50mA for MultiPlus-II (5m)
Lynx Distributor (M8)
2x MEGA-fuse 125A/58V for 48V products
You may notice there is no MPPT solar charge controller. This is because our PV array is 16x 30V panels in series (total 480V) and the Victron MPPT solar charge controls don’t support that voltage (and I have no intention of getting up on the roof to split into multiple smaller strings).
For now, we’ll keen the Fronius IG TL inverter and live with the fact we’re losing a bit in the DC -> AC -> DC -> AC conversion.
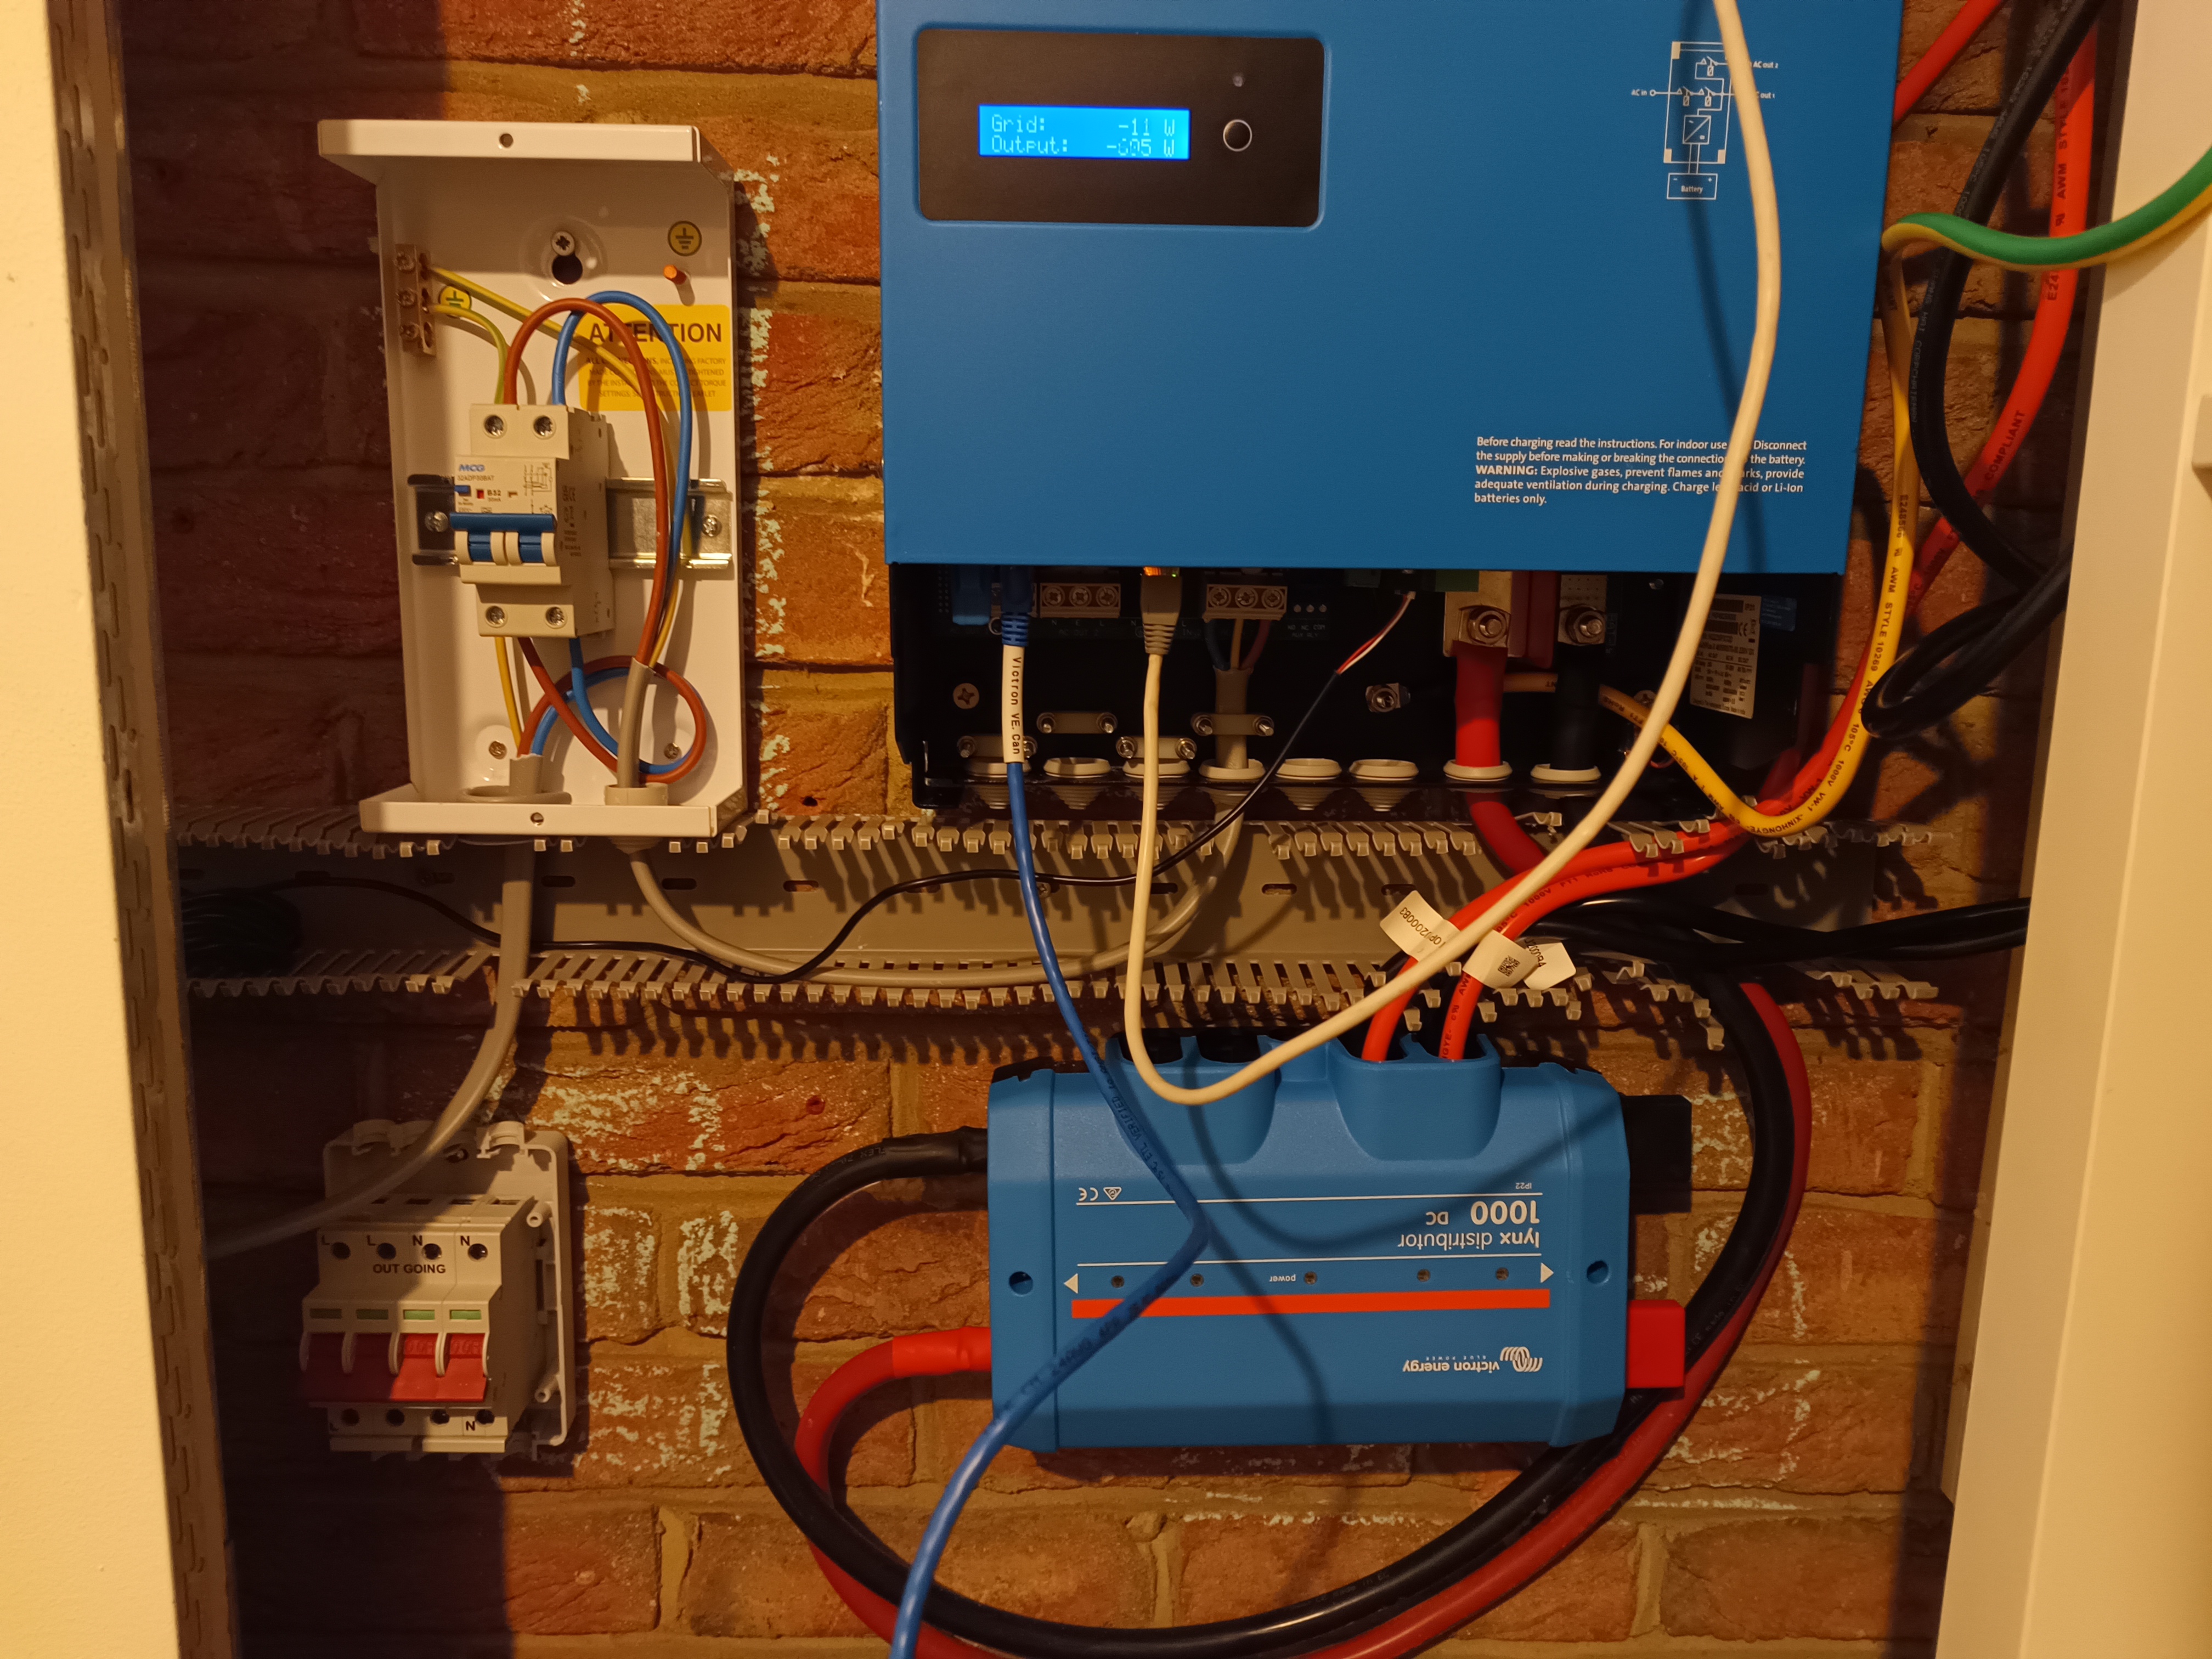
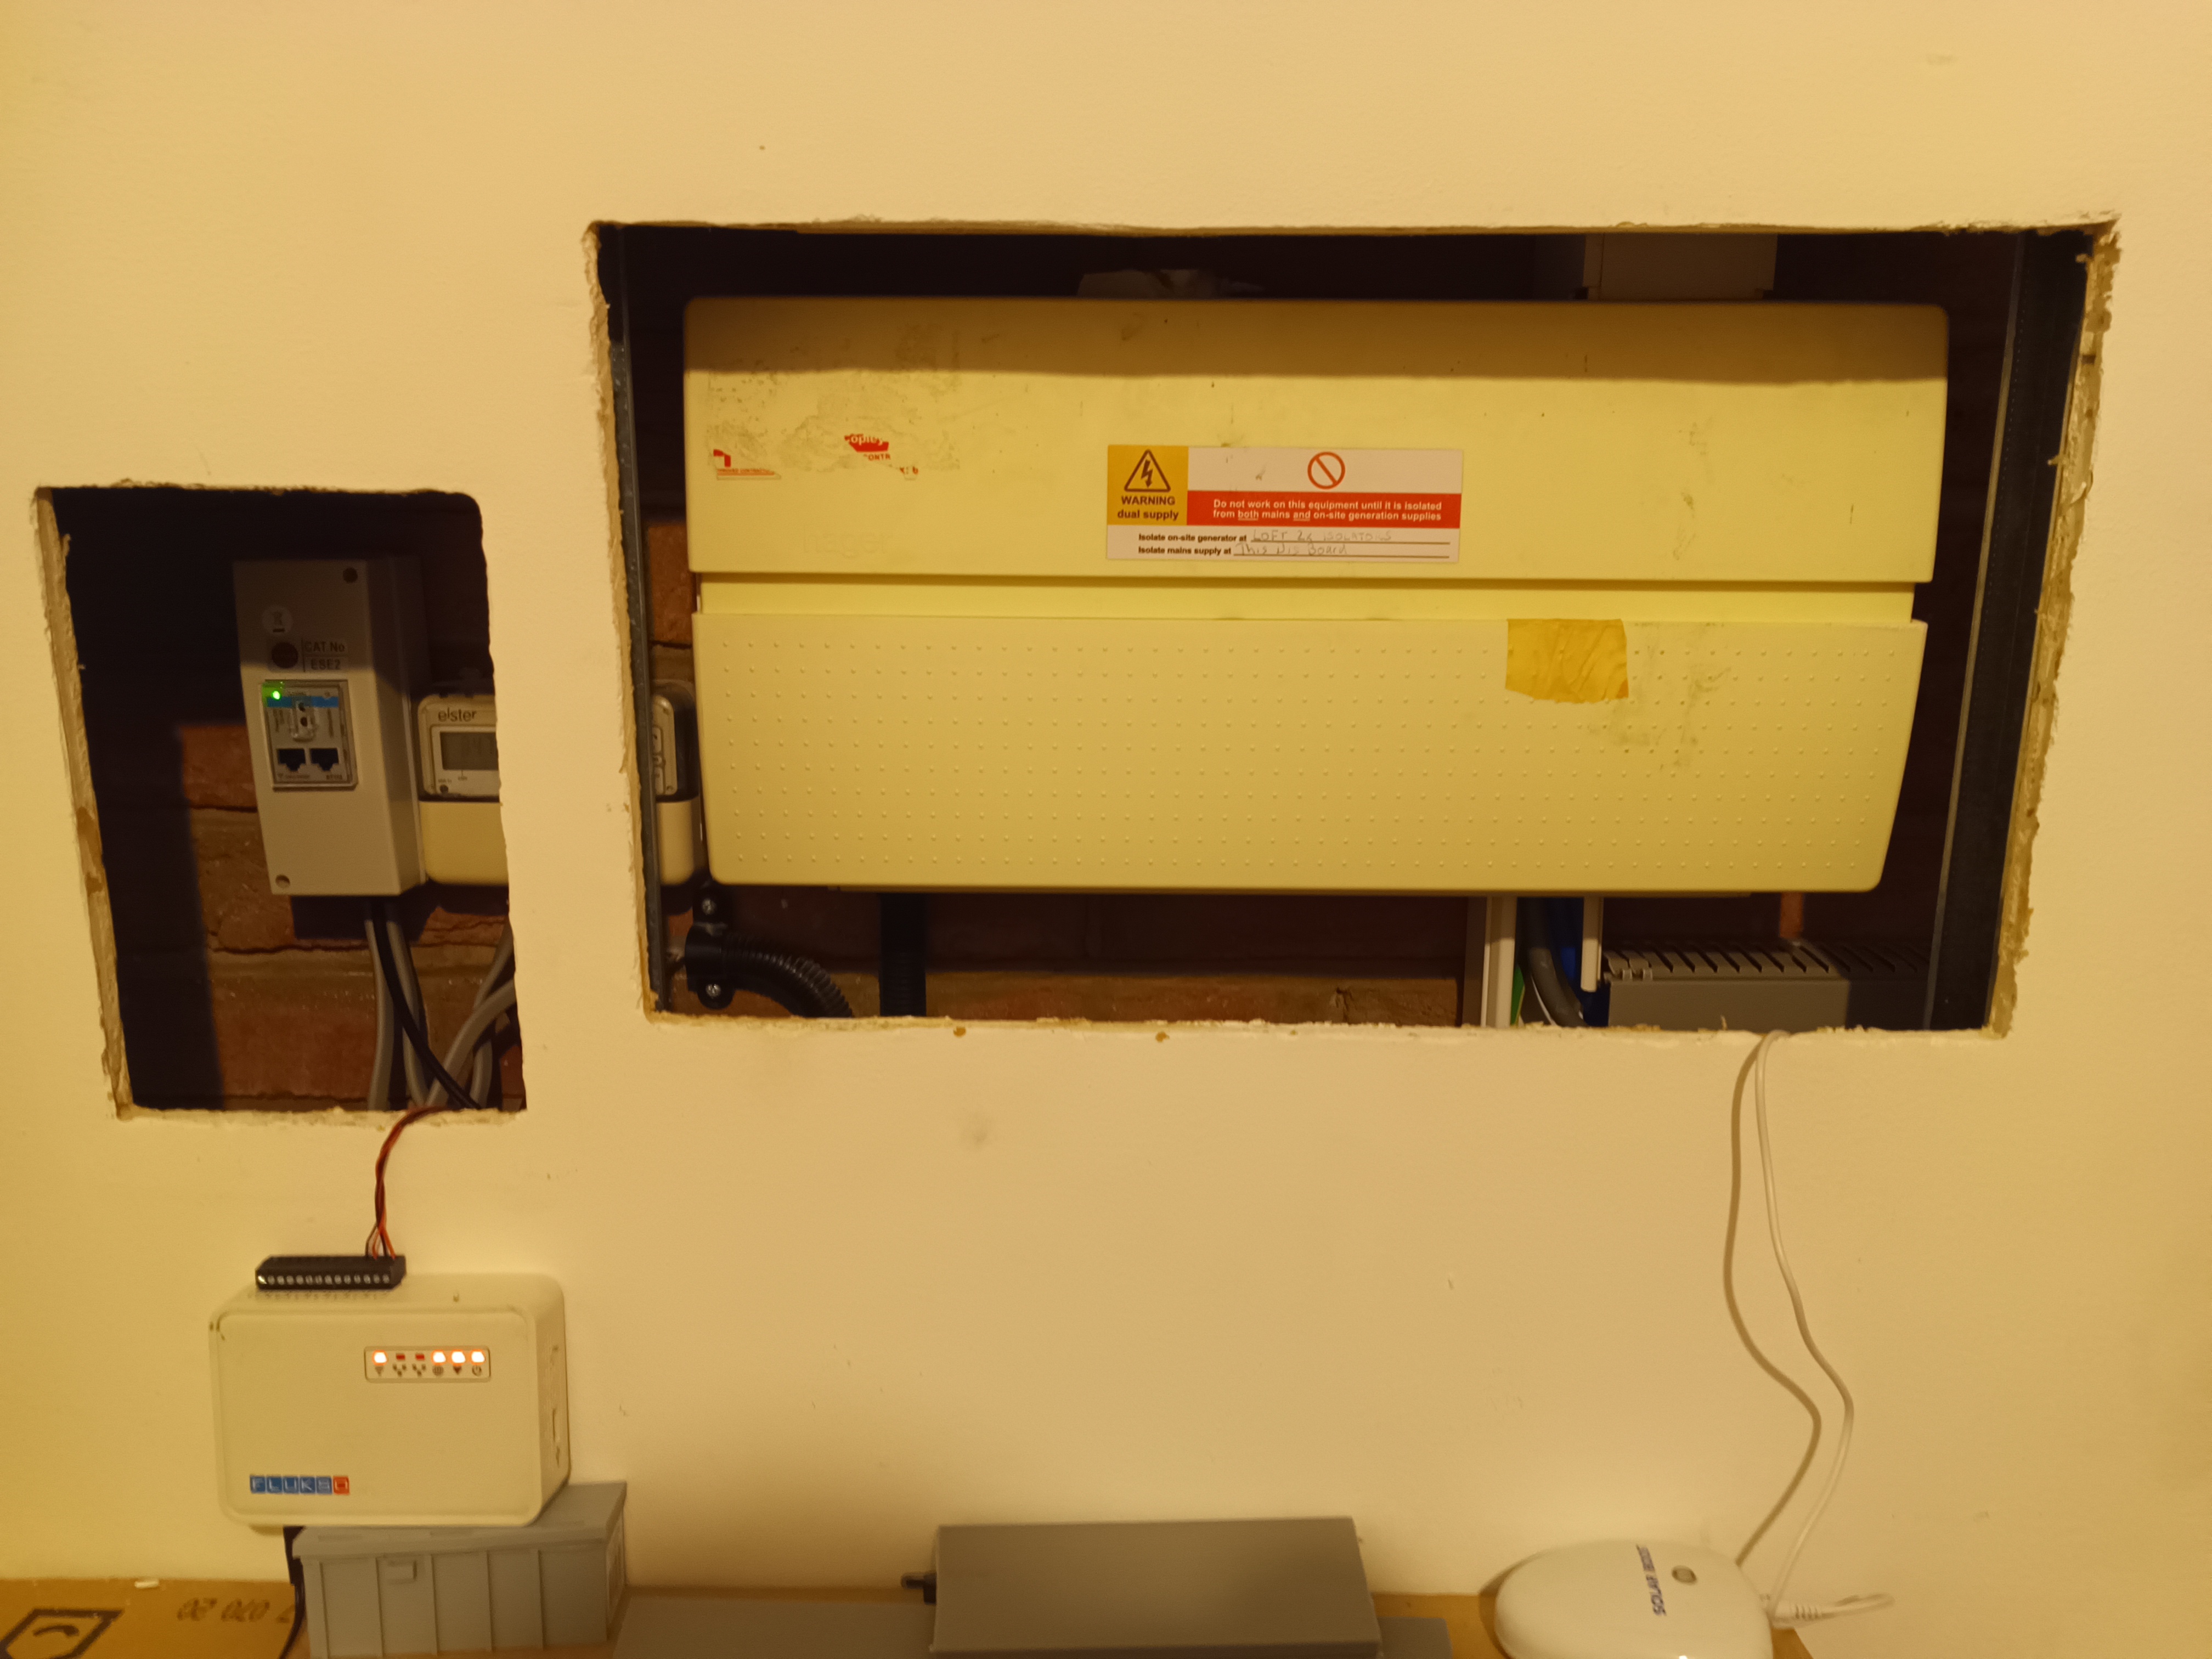
WORK IN PROGRESS- I have tried to keep the connections “in the right place” (e.g. ports in the correct positions on each device etc). The result unfortunately is a big spaghetti like?
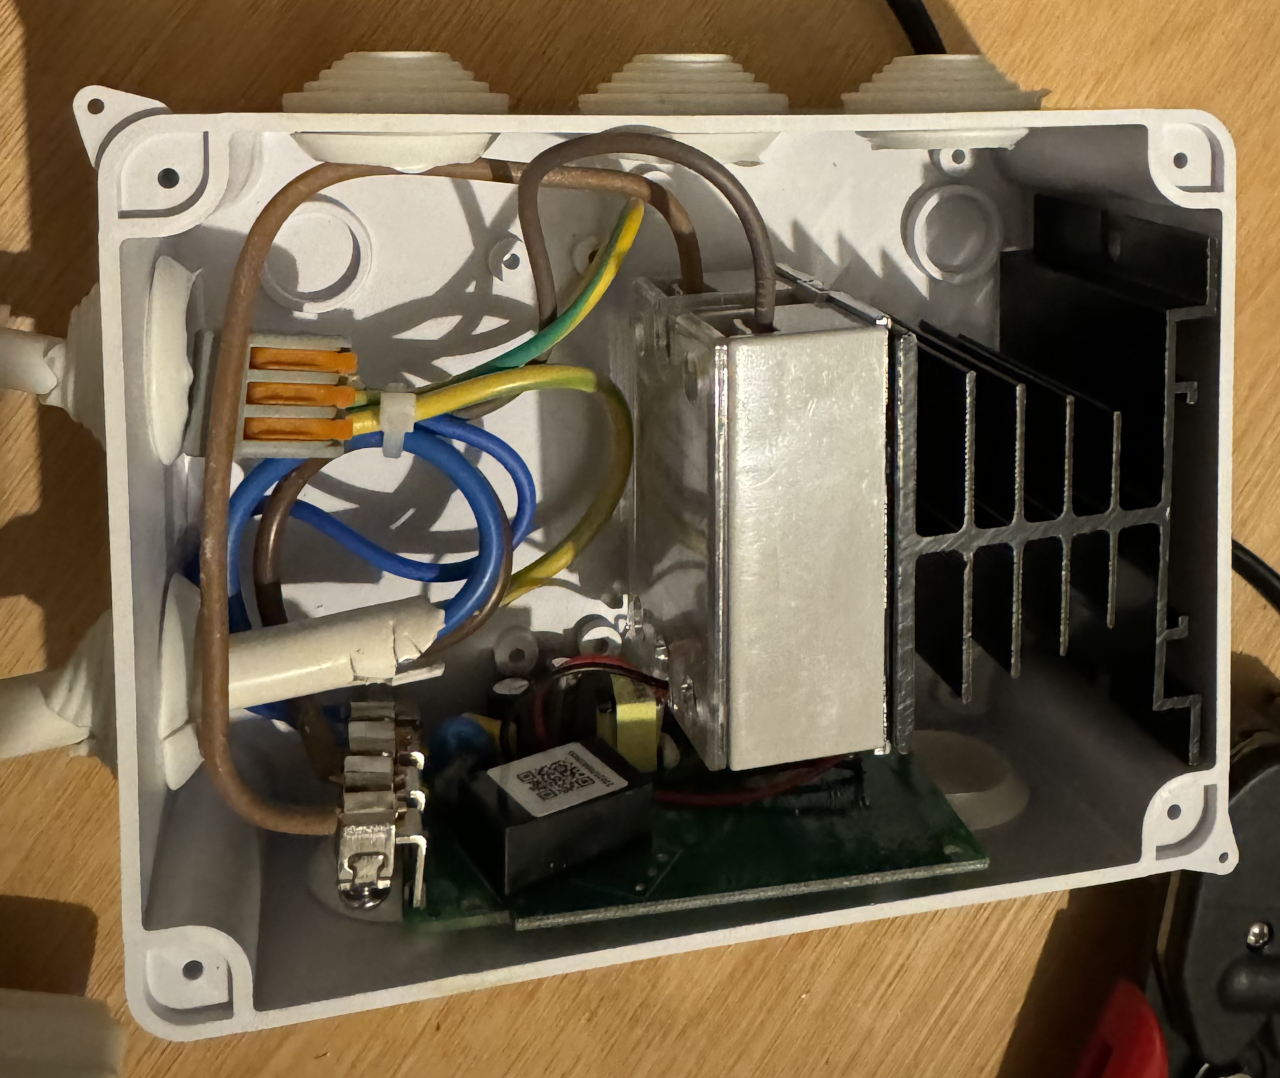
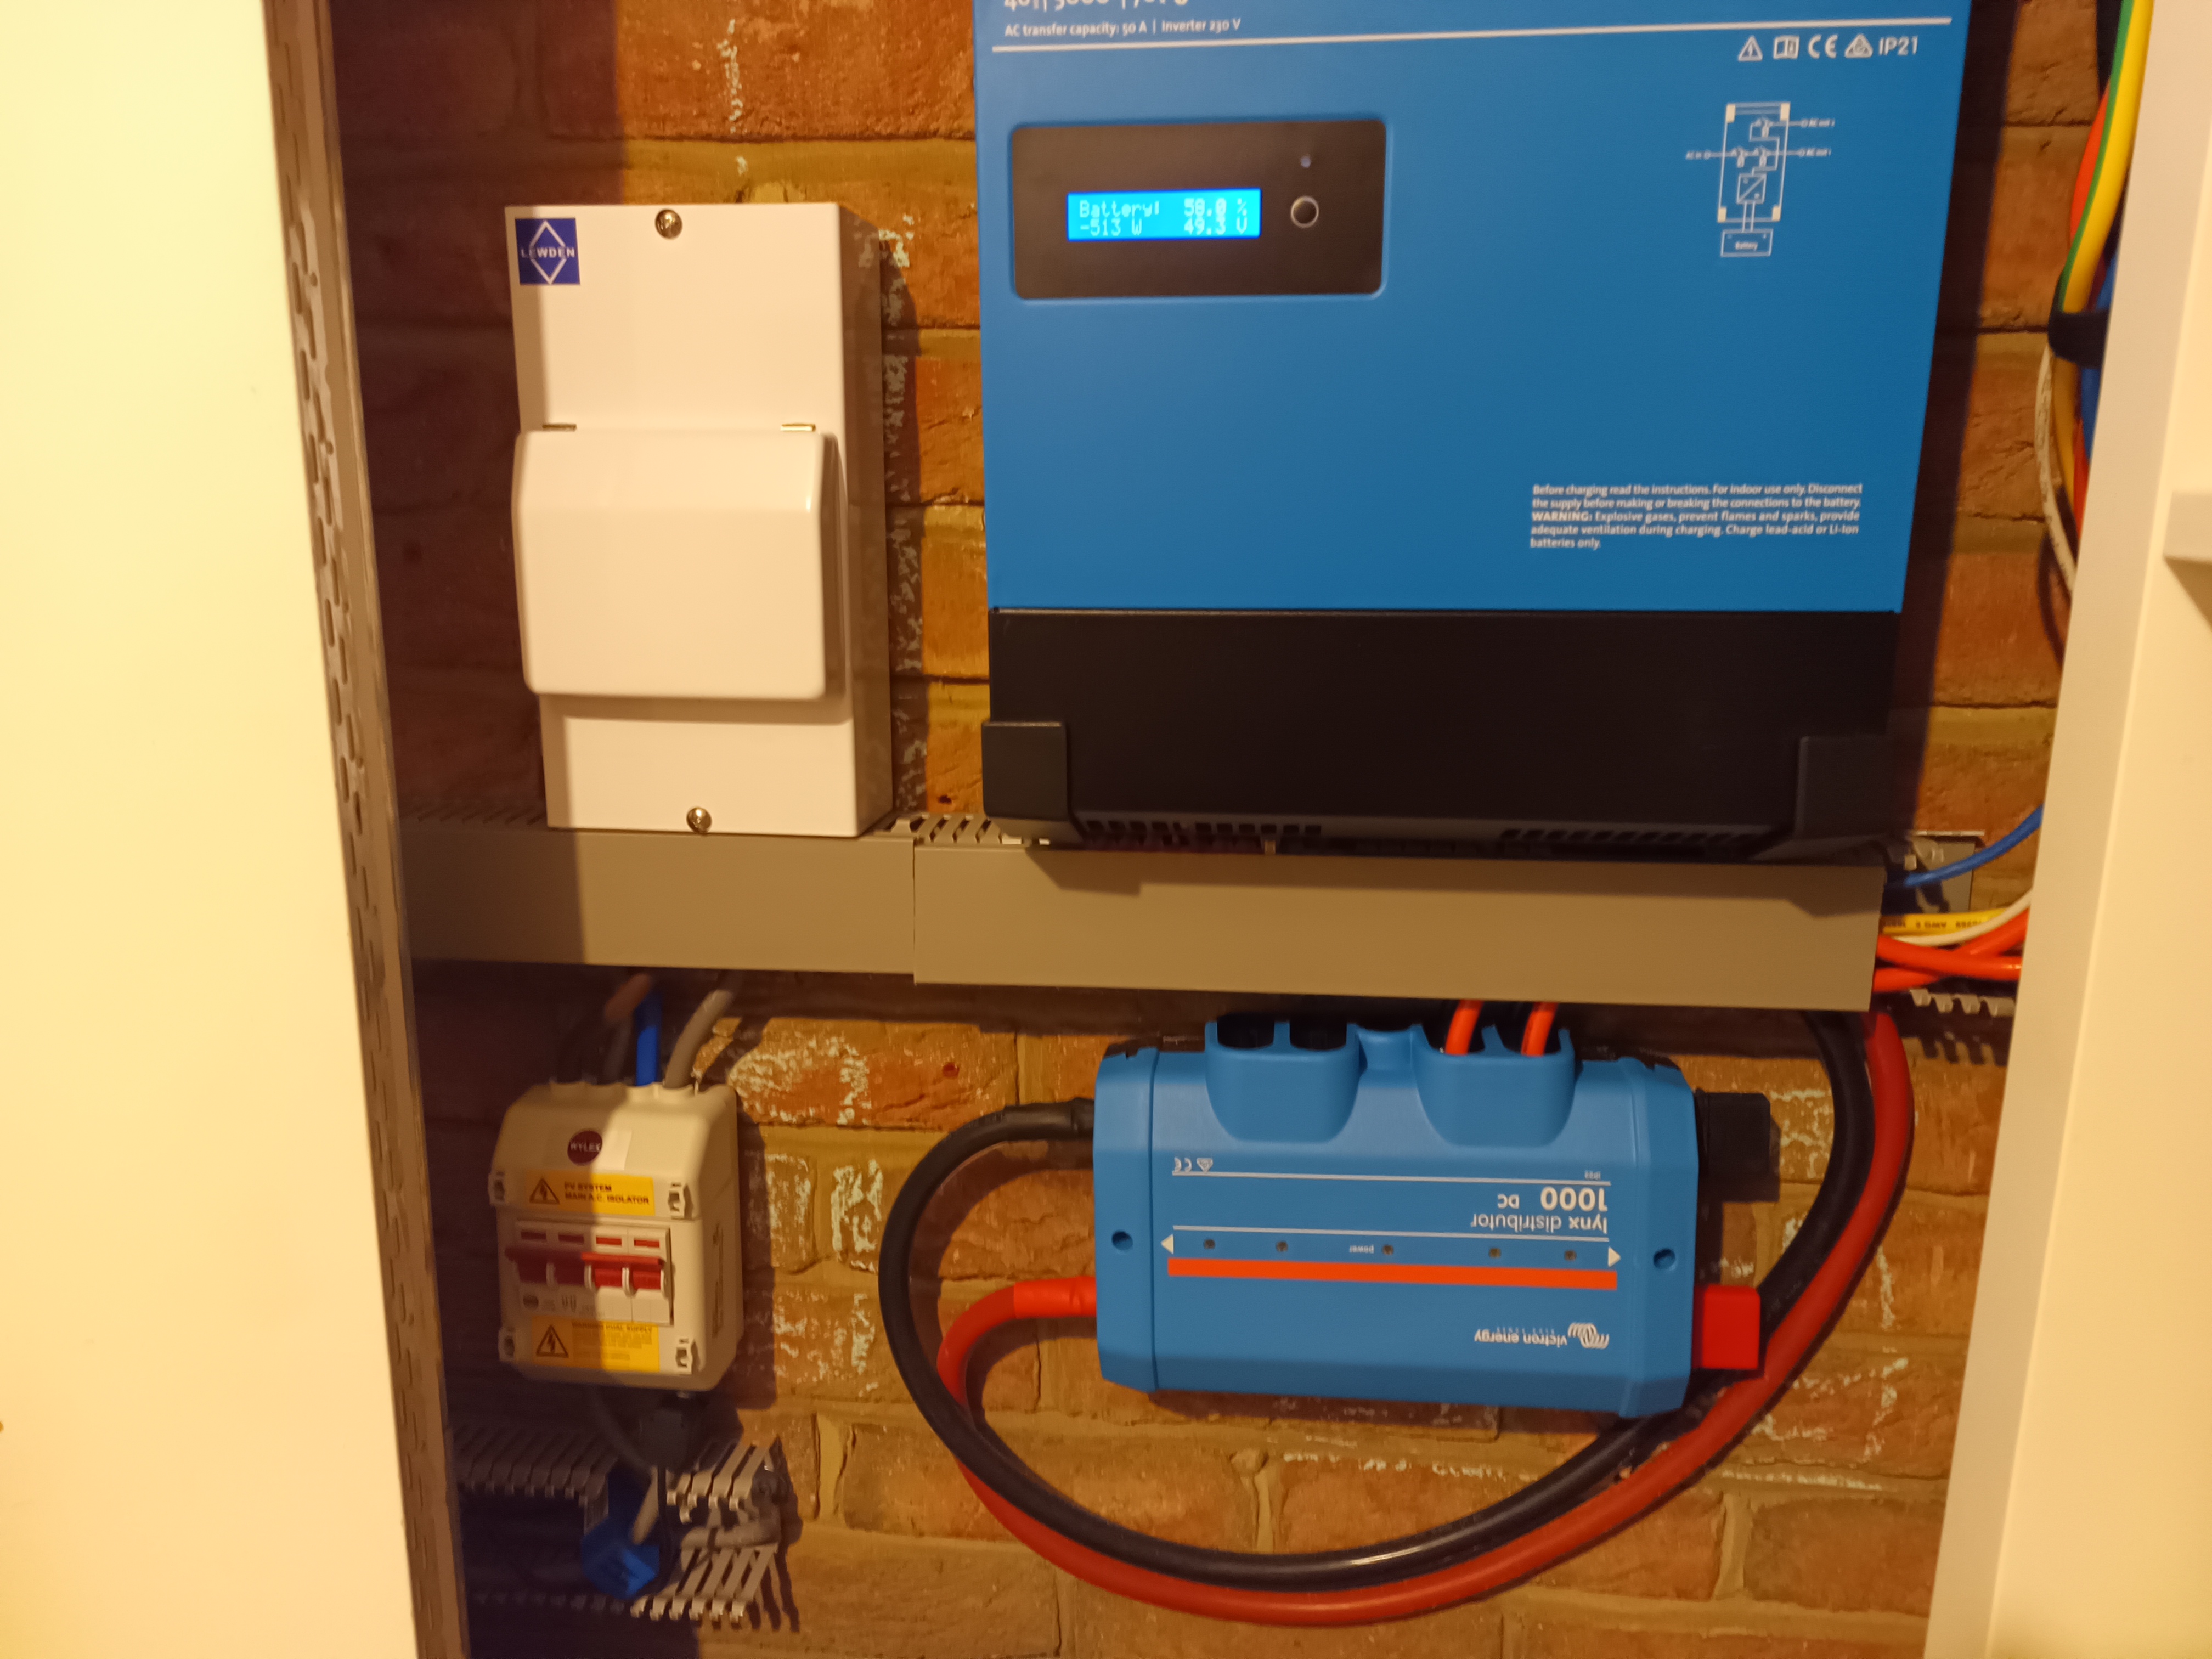
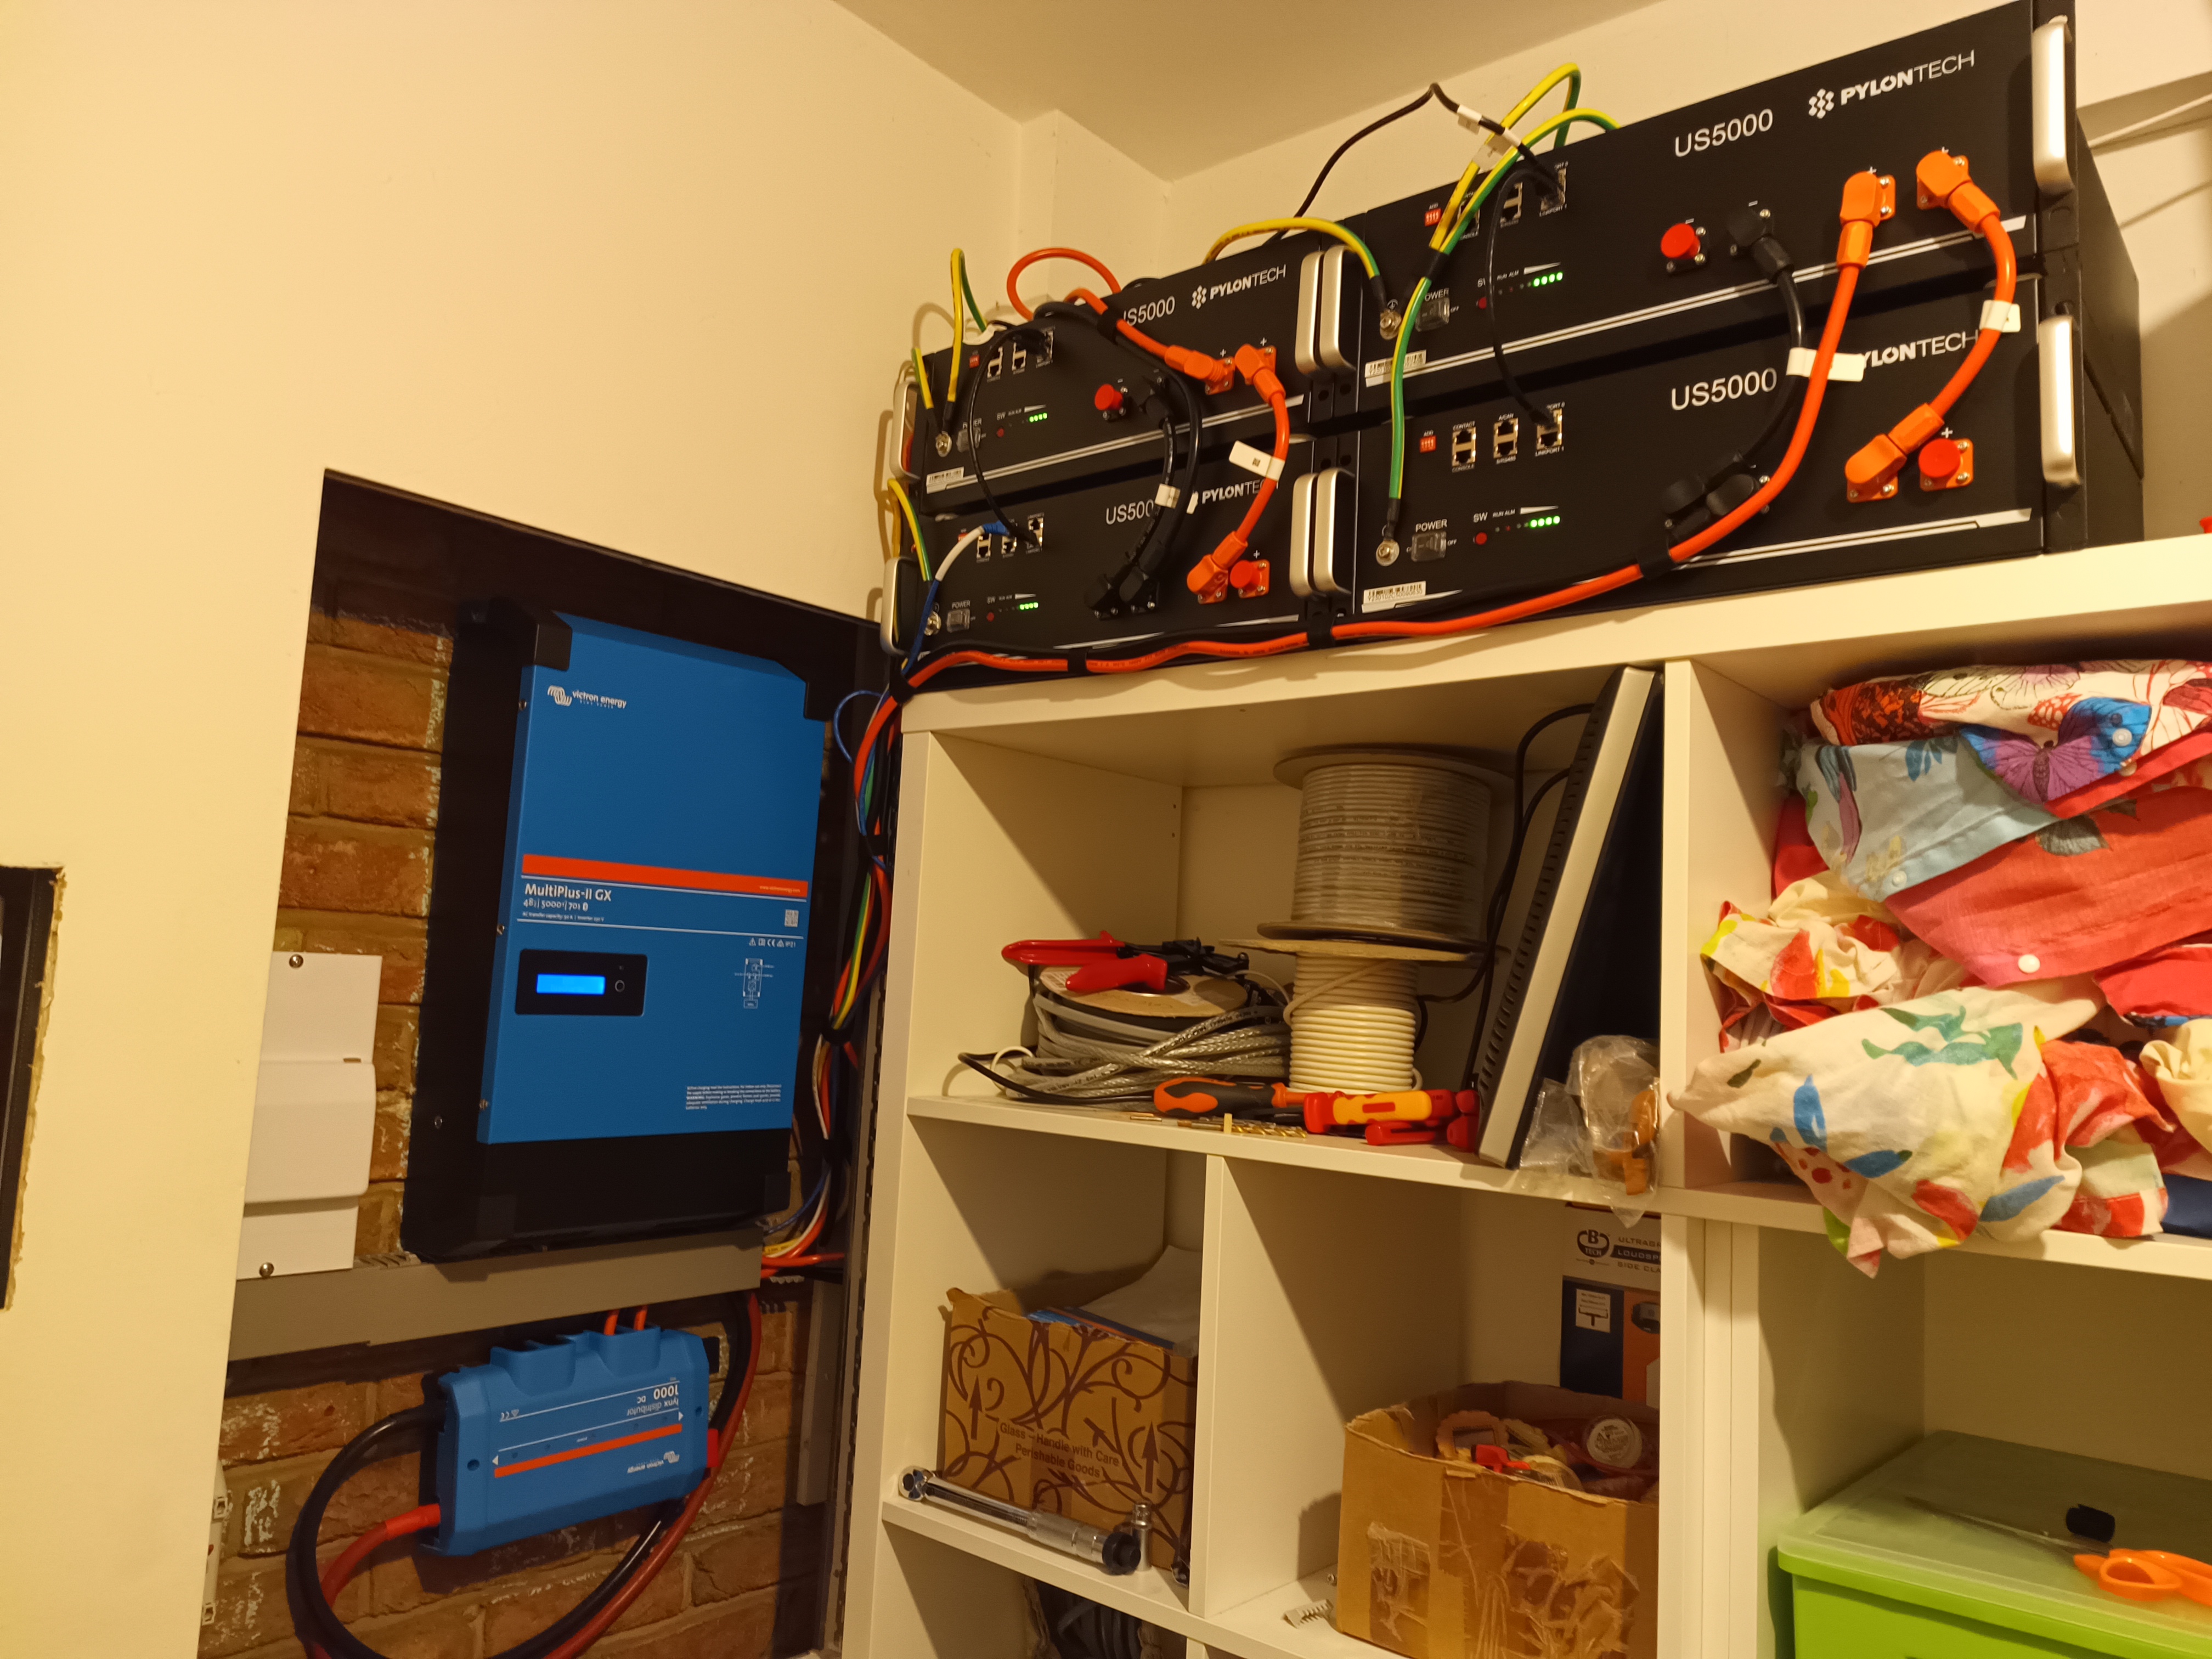
I deliberately included a photo below before I closed everything up so you can see most of the connections (before i’d re-routed/tidied etc).
Install photo(s):
The cable management could still use a bit of work, but it’s good enough for the moment.
Some notes:
The current clamp/transformer is used to measure the electricity coming in/going out to the grid (it is quit responsive).
The ET112 energy meter is used to measure the electricity coming in from the Fronius inverter (it has a bit more of a lag and requires “splicing” into the AC feed. There are a few faster Carlo Gavazzi devices and there are some current clamp/transformer type energy meters, but none of them are fast & CT type (and many of them have a max current of 5A)- https://www.victronenergy.com/upload/documents/Datasheet-Energy-Meters-Selection-Guide-EN.pdf. I am quite surprised the GX device doesn’t support more energy meters (especially as I believe the underlying operation system is open source). Perhaps in the future this may be something I can contribute upstream? https://github.com/victronenergy/dbus-cgwacs/
The Lynx Distributor end cable entry holes were not big enough for the 70mm2 cables. I used a multi-tool to open them up a bit.
I should have ordered shorter 70mm2 cables, then I could have gone straight up and into the MultiPlus. I’m not comfortable with trying to cut and crimp to my own length yet, but that may be something I end up doing.
Getting the batteries connected to the MultiPlus was a bit confusing. I couldn’t understand whether to use the VE.Bus port or VE.Can. It ended up needing to be the VE.Can port (with a terminator in the other port) and needing to adjust the settings on the GX device: Settings > Services > VE.Can > CAN-bus BMS (500 kbit/s)
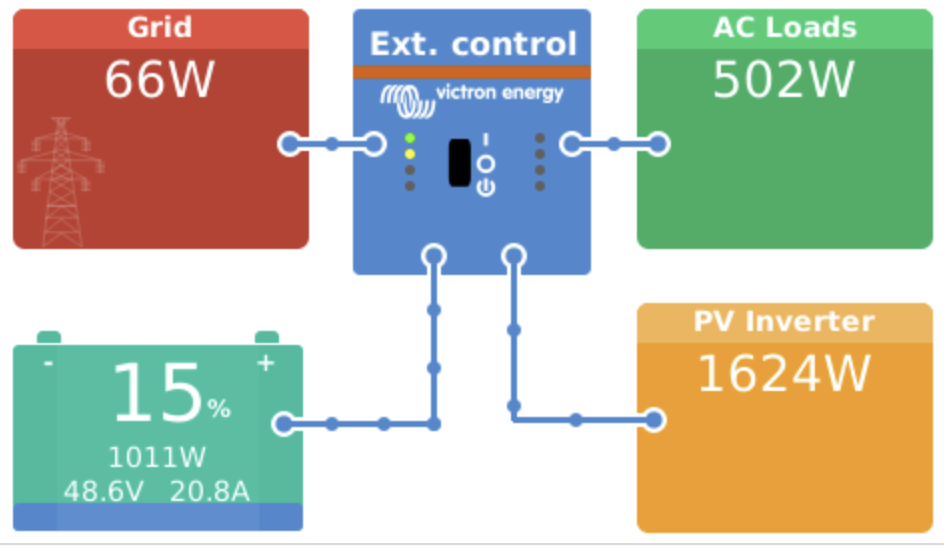
Getting the system working as desired (trying to maintain no import/export from the grid by charging batteries when generation > consumption and discharging them when consumption > generation) was far from obvious. Huge shout out to Etienne for sorting this. It requires dumping the MultiPlus config from the VRM portal- https://vrm.victronenergy.com > Device list > Remote VEConfigure > Download, then using the VEConfigure software to install the ESS Assistant and upload the modified config.
Getting the ET112 connected was trickier than anticipated too. The default baud rate was not compatible with the GX. I had to connect the USB RS485 cable to my laptop and use the UCS desktop app to find the device and change the baud rate to 9600- https://www.gavazziautomation.com/data_center/EN#download
After getting the ET112 to show up the numbers weren’t adding up/making sense. I poked and prodded a little, and figured Settings > Energy meters > Position (default AC Input 1) needed to be changed to AC Output.
Connecting everything up to the mains and splitting the incoming meter tails was something I wanted to leave to the professionals. Big thanks to Rob, Si and Noel at Lawson Electrical Services for sorting that at short notice- https://www.lawsonelectrical.co.uk/
Please feel free to reach out if you have any questions. I’m sure I missed a few questions/issues I stumbled across along the way.
I had a few “next steps” on my list. The first was to fix the 2nd node in the node pool (it was reportedly “not healthy”).
Connecting to the node I found some overlayfs errors, but no clear solution on Google of ChatGPT. I terminated the node and a new one automatically appeared- this time “healthy”. That was easy!
The next was to try and understand how to run multiple web-servers behind the single public IP.
I spent a lot of time being misled by ChatGPT (trying various techniques to get oci_network_load_balancer_network_load_balancer to route based on hostname, using oci_load_balancer_path_route_set for example) to eventually find that it’s a layer 3 / 4 load balancer and is not capable!
But, it’s all good, oci_load_balancer_load_balancer provides a layer 7 load balancer, which is capable.
It may not be the best solution, but after some poking around, I ended up with 2 nginx servers running in the cluster accessible via 2 different hostnames (using nip.io).
Adds a second Kubernetes service (the second deployment is still currently being deployed via a different project)
Replaces the hardcoded target from the previous backend (this still needs a little work as there is a dependency which prevents the infrastructure being built in a single pass- e.g. the nodes need to be created first, then the output can be used in the for each loop)
I noticed after a few days, the load balancer was costing a bit- but believe that’s because I set the shape to 100Mbps – now i’ve switched to 10Mbps I think it should be “always free”.
Now we have 2 healthy nodes, let’s try and increase the replicas?
It looks like MY_NODE_NAME (e.g. spec.nodeName) contains the pod IP. That’s as far as I’ve had time to dive so far.
Next steps:
Polish things a little (use better naming, potentially create some modules to remove all the duplication with listeners, backend sets, services etc)
Take a look the GitOps workflow
Find a “good” SSL solution. I’ve managed to use Cloudflare DNS to add free SSL but that requires creating a new DNS entry for each hostname- ideally I would use a wildcard DNS but don’t want to go down the LetsEncrypt route.
Improve visibility/observability (easily be able to list pods, services, deployments, view logs etc)
Learn more about Kubernetes and persistent storage (at the moment, all of the deployments pull docker images, spin them up and then destroy them- what if I want a database?)
I will try and talk through my process of following/tweaking the above to work with GitLab and the Kubernetes Agent Service (KAS). Here is my current (probably not final) terraform config:
This tells Terraform/Oracle to use the Oracle-Linux-8.7-aarch64-2023.01.31-3 image (from the UK region) instead of the Oracle Linux 7 image being used by Arnold.
I initially tried with the latest Oracle Linux 9 image, but received the following error:
│ Error: 400-InvalidParameter, Invalid nodeSourceDetails.imageId: Node image not supported.
│ Suggestion: Please update the parameter(s) in the Terraform config as per error message Invalid nodeSourceDetails.imageId: Node image not supported.
So dropped back. And lastly, the default deployment has been removed (you can see the service is still configured though).
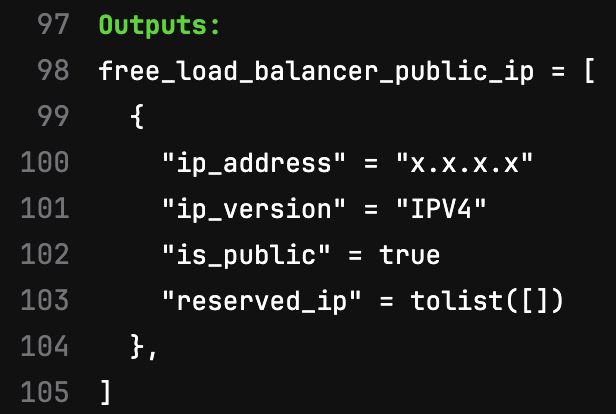
After the pipeline runs in GitLab, and I manually run the deploy job, we see Terraform output the load balancer public IP address- we’ll need that later!
The cluster is up and running- what’s next? We need to get it talking to GitLab. I believe the logical approach is to use the GitLab Kubernetes Agent Service (KAS).
Note: I suspect I need to revisit this and incorporate the helm installation in the Terraform configuration at a later stage.
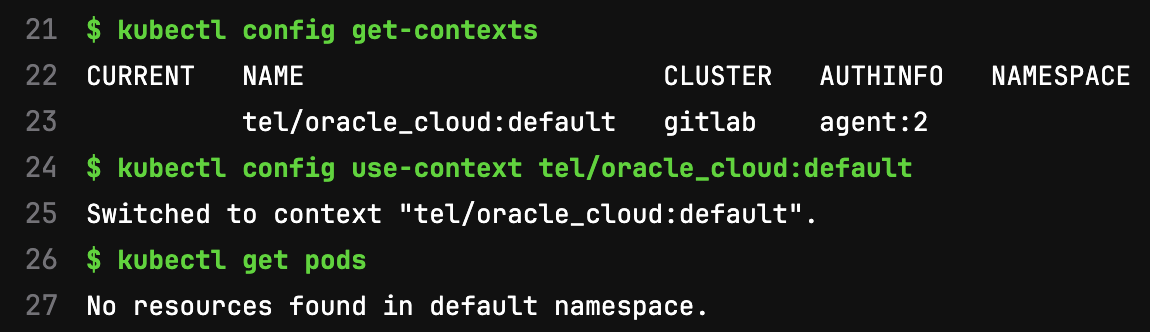
So what does this mean? Well, it looks like (as i’m not quite ready to dive in head first with the GitOps workflow), that I can now interact with the cluster from GitLab using the trusty CI/CD workflow: https://docs.gitlab.com/ee/user/clusters/agent/ci_cd_workflow.html
I created a simple project with a simple .gitlab-ci.yml to see if this was true:
Voila! Great- but what can we do now? Well, we’re missing a few small pieces in order to deploy a web server. We need to create a namespace, and a service (back in our Terraform project):
I tripped up bad here. I went deep down the rabbit hole trying to understand how GitLab knew how to connect to the Kubernetes cluster, and figure out how to get the Kubernetes provider for Terraform to connect to it.
I knew the config_context (as we provided that in the kubectl command above. But I did not need a config file for the kubectl script. I went so deep I ended up building custom docker images based on Oracle Linux, containing the OCI client, Terraform, GitLab Terraform (and dependencies, jq, idns2 etc).
Eventually when I was about to admit defeat, I reached out on the GitLab Discord server and the legend Patrick Rice (one of the GitLab provider for Terraform maintainers) came to the rescue- thank you Patrick!
It turns out, we have access to $KUBECONFIG – an environment variable containing the path to the config file needed to connect to the cluster! This is documented:
All CI/CD jobs now include a KUBECONFIG with contexts for every shared agent connection. Choose the context to run kubectl commands from your CI/CD scripts.
But I guess I was a bit out of my depth and needed it spoon fed a little. I have taken the opportunity to raise a merge request to improve the documentation– let’s see what happens!
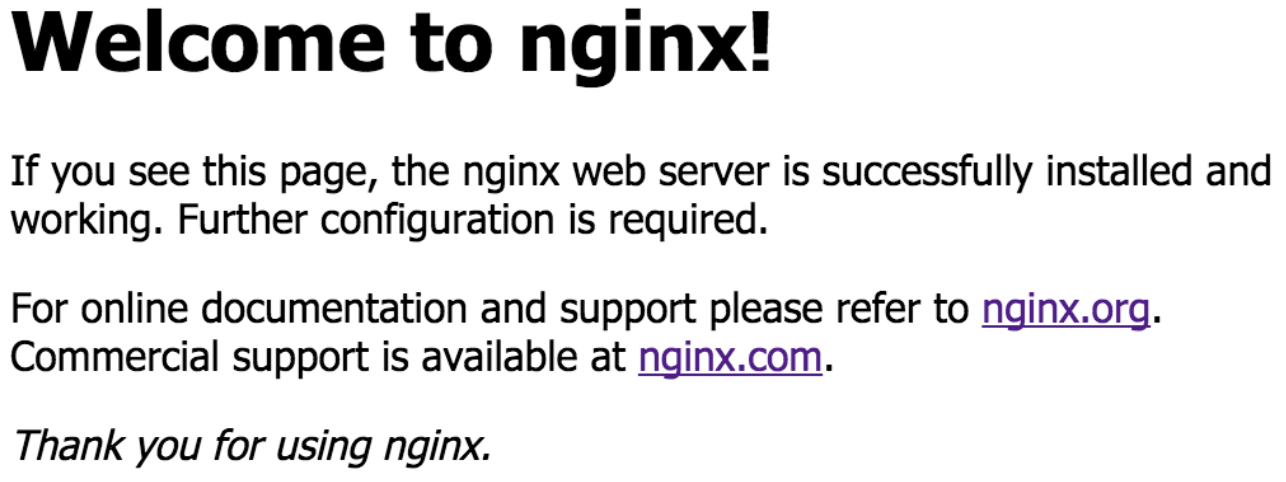
Right, now we’re back on track, let’s try and deploy a default nginx container. We create a deployment.yaml:
Sounds promising? Now ket’s hit the load balancer IP we jotted down earlier:
Awesome! Right, just one more small step for this experiment “today” (or so I thought). How can I load some custom content into nginx?
I’m sure there are a number of techniques, but a common approach seems to be creating a custom docker image, simply adding a custom index.html on top of the default one. So let’s create a Dockerfile in our project:
FROM nginx
COPY index.html /usr/share/nginx/html/index.html
And a sample index.html
<!DOCTYPE html>
<html>
    <head>
        <title>Free Kubernetes</title>
    </head>
    <body>
        <h1>This is a custom page running on a Free Kubernetes cluster on Oracle Cloud</h1>
        <h1>GitLab CI/CD pipeline build a custom Docker image on top of nginx and deployed it to Kubernetes</h1>
    </body>
</html>
And we need our .gitlab-ci.yml to build the docker image:
I should add, i’m using a self hosted GitLab instance and at this stage, I had to reconfigure it as container registry wasn’t even enabled. But the above was now working great!
So how do we get the custom docker image into Kubernetes? Let’s combine our build and deploy jobs in our .gitlab-ci.yml
Note we also needed to create a deploy token, and use that to create a Kubernetes secret which we can use to authorize against our container registry to pull our custom image. Here’s the updated deployment.yaml
Now I should be able to hit the load balancer and see my custom page. Nope! Doh- what went wrong?
I should have taken some better notes/screenshots at the time, but I was seeing a pod status crashloopbackoff (when running kubectl get pods and the error exec /docker-entrypoint.sh: exec format error (when running kubectl logs pod-id).
Google and ChatCPT both told me it was likely an architecture issue (e.g. the Docker image being built on amd64 but my Kuberenetes nodes running arm64).
This looked like a simple problem, and using docker buildx should have me up and running in no time. But again, down the rabbit hole we go. Targetting arm64 didn’t seem to be making any difference. I tried all sorts, the image was even running AOK locally on my M1 MacBook Pro (arm64).
Eventually I noticed the docker push output seemed to be suggesting the built image was identical (even when changing the target platform):
And this got me to the problem/solution. For some reason the image I was building was not being pushed, but a previously built image. I updated the Docker commands to build and push in a single operation, and bingo!
I hope to circle back to this in the coming weeks and get everything neatened up a little. Perhaps try and understand GitOps and how I might be able to use the Kubernetes load balancer to host multiple web applications behind the single public IP.
During my team’s weekly meeting we discuss our OKRs and were getting frustrated with the manual effort of collating (duplicating) the OKRs. We considered dropping it, but didn’t want to miss the opportunity to share and discuss progress.
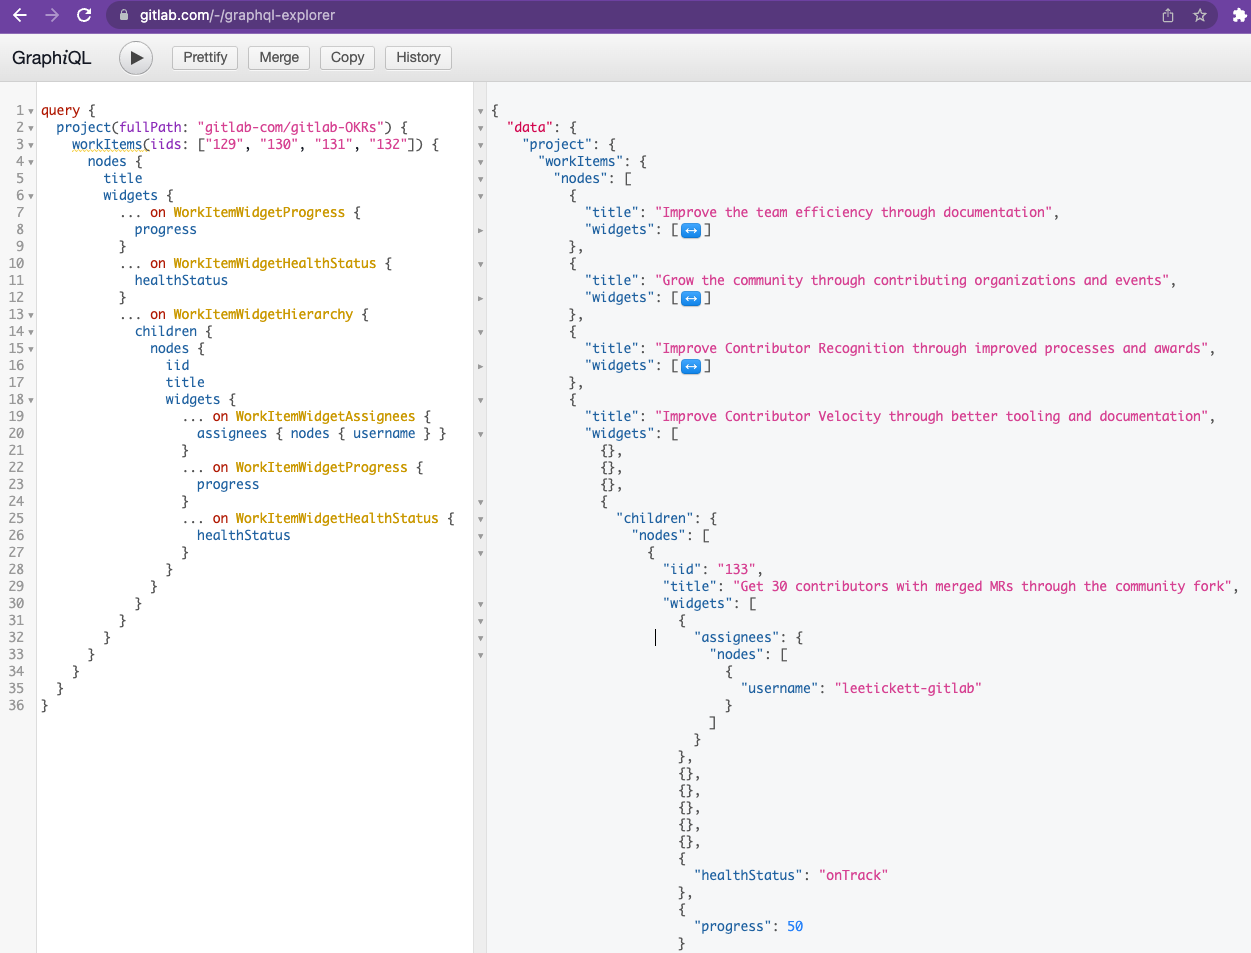
Fortunately, GitLab has an awesome API (GraphQL is my favourite) and we can get the data out programmatically. Similarly, Google has Apps Scripts which allow us to call APIs.
GitLab provides a handy “out of the box” UI for knocking up GraphQL queries (GraphiQL / GraphQL Explorer https://gitlab.com/-/graphql-explorer). I wasn’t familiar with work items and widgets, but it didn’t take too long to knock up:
Now we need a script to make the API request and process the response:
I’m sure there are a lot of opportunities for improvement, but it does the job and didn’t take long to throw together (we can iterate later if we so desire).
Unfortunately, I couldn’t find a way to bind the script to a keyboard shortcut, but it was straightforward to create a custom menu to call it:
function onOpen() {
  var ui = DocumentApp.getUi();
  ui.createMenu('GitLab')
    .addItem('Insert Contributor Success OKR Update', 'getOkrSummary')
    .addToUi();
}
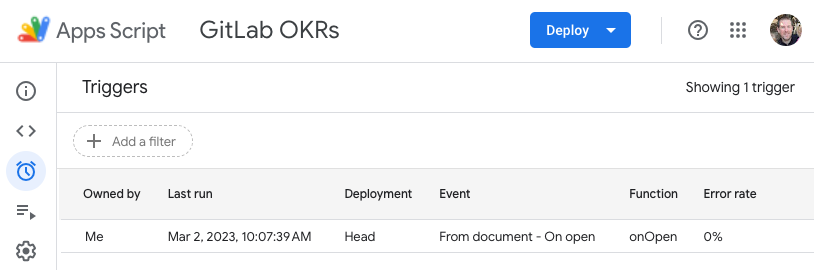
Then simply adding a trigger to call the onOpen function when the Google doc is opened.
Now it’s all together- it works a little something like this:
Not too long ago I was introduced to Terraform as a mechanism of managing Cloudflare DNS “as code”. It took quite a bit of trial and error, poking around, and some great support from the GitLab community over on Discord: https://discord.gg/gitlab – thank you!
During recent conversations with GitLab team members, we expressed a desire to manage Discord via Infrastructure as Code (IaC) e.g. Terraform. Others had taken a look and shared some concerns around the lack of a well maintained Terraform provider for Discord, but I wanted to do a little investigation and take another opportunity to learn.
One of the big considerations was the underlying Discord API version being used. I think 6 and 8 have been, or will be deprecated soon. I know very little about Golang, but from https://github.com/Lucky3028/terraform-provider-discord/blob/master/go.mod it looks like the Terraform provider is using https://github.com/bwmarrin/discordgo as an API wrapper. Checking for issues/pull requests, it appears to be using API version 9 with an open pull request to bump it to version 10, so I think we’re in safe hands!
Early on, while poking around I spotted a typo (copy/paste error) in the docs, raised a pull request and had it merged within a couple of hours- so this was quite reassuring.
What next? Well, we need to setup a GitLab project to manage the Discord server. I used the same .gitlab-ci.yml I’m using for my Cloudflare project:
# Terraform/Base.latest
#
# The purpose of this template is to provide flexibility to the user so
# they are able to only include the jobs that they find interesting.
#
# Therefore, this template is not supposed to run any jobs. The idea is to only
# create hidden jobs. See: https://docs.gitlab.com/ee/ci/yaml/#hide-jobs
#
# There is a more opinionated template which we suggest the users to abide,
# which is the lib/gitlab/ci/templates/Terraform.latest.gitlab-ci.yml

image:
  name: "$CI_TEMPLATE_REGISTRY_HOST/gitlab-org/terraform-images/stable:latest"

variables:
  TF_ROOT: ${CI_PROJECT_DIR}  # The relative path to the root directory of the Terraform project
  TF_STATE_NAME: default  # The name of the state file used by the GitLab Managed Terraform state backend

cache:
  key: "${TF_ROOT}"
  paths:
    - ${TF_ROOT}/.terraform/

.terraform:fmt: &terraform_fmt
  stage: validate
  script:
    - cd "${TF_ROOT}"
    - gitlab-terraform fmt
  allow_failure: true

.terraform:validate: &terraform_validate
  stage: validate
  script:
    - cd "${TF_ROOT}"
    - gitlab-terraform validate

.terraform:build: &terraform_build
  stage: build
  script:
    - cd "${TF_ROOT}"
    - echo $TF_ADDRESS
    - gitlab-terraform plan
    - gitlab-terraform plan-json
  resource_group: ${TF_STATE_NAME}
  artifacts:
    paths:
      - ${TF_ROOT}/plan.cache
    reports:
      terraform: ${TF_ROOT}/plan.json

.terraform:deploy: &terraform_deploy
  stage: deploy
  script:
    - cd "${TF_ROOT}"
    - gitlab-terraform apply
  resource_group: ${TF_STATE_NAME}
  rules:
    - if: $CI_COMMIT_BRANCH == $CI_DEFAULT_BRANCH
      when: manual

.terraform:destroy: &terraform_destroy
  stage: cleanup
  script:
    - cd "${TF_ROOT}"
    - gitlab-terraform destroy
  resource_group: ${TF_STATE_NAME}
  when: manual

stages:
  - validate
  - test
  - build
  - deploy

fmt:
  extends: .terraform:fmt
  tags:
    - docker
  needs: []

validate:
  extends: .terraform:validate
  tags:
    - docker
  needs: []

build:
  extends: .terraform:build
  tags:
    - docker

deploy:
  extends: .terraform:deploy
  tags:
    - docker
  dependencies:
    - build
  environment:
    name: $TF_STATE_NAME
This deviates a little from the latest “off the shelf” but nothing too crazy. It essentially:
Validates the Terraform files
Lints the Terraform files
Displays changes (based on the state managed by the GitLab backend compared to the Terraform files)
Deploys the changes (via a manual job created once merged to the default branch)
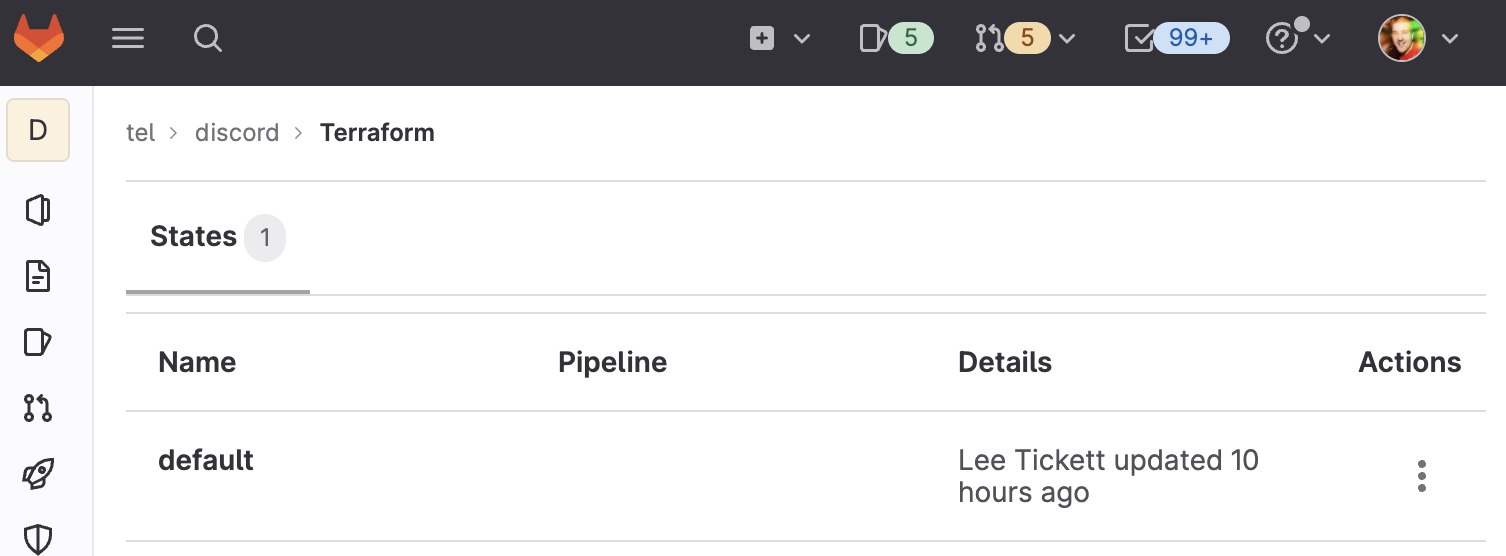
I’ve yet to learn all the best practices, but opted for a backend.tf containing some basics:
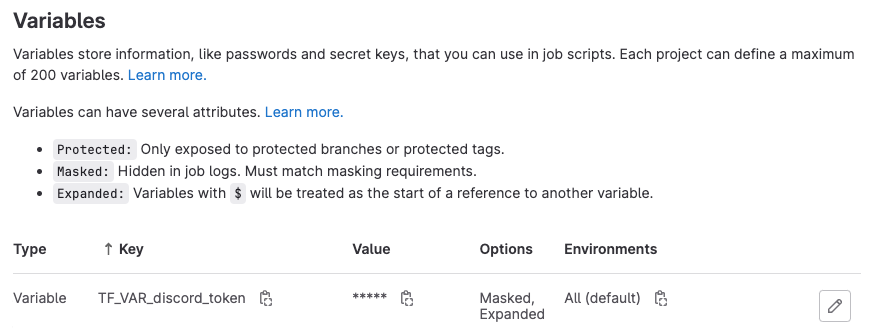
For this to work, we’ll need to define the TF_VAR_discord_token in GitLab CI/CD variables:
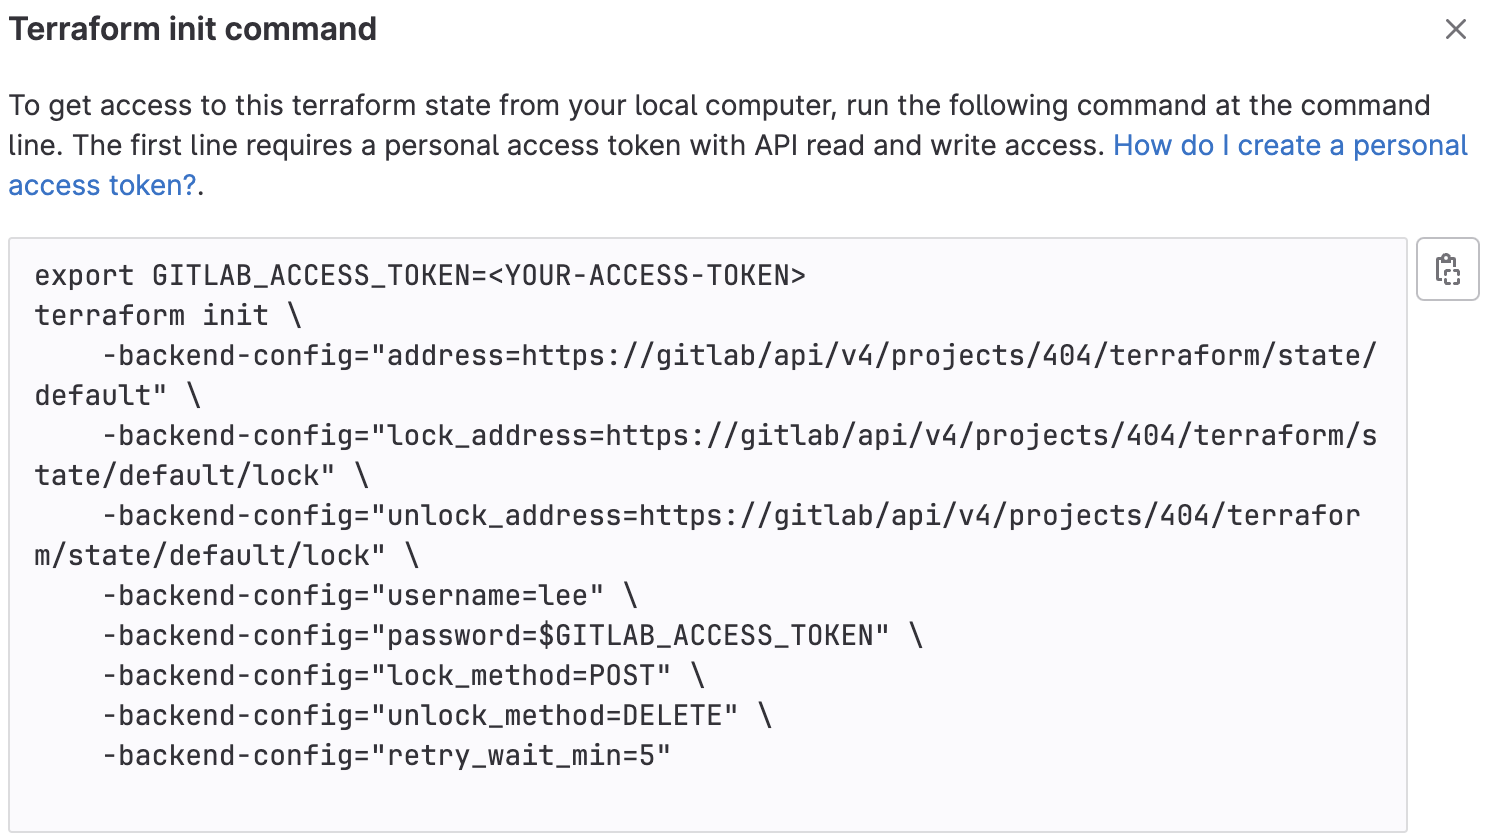
After pushing, the backend is initialized and we can grab the init command from the GitLab UI:
Now it starts to get interesting. We can run the terraform init command locally and start importing our existing Discord configuration into the state (and dump it into Terraform files).
When working with CloudFlare, I had the benefit of a special tool to to do this: https://github.com/cloudflare/cf-terraforming – so this is the first time I’ve had to try and understand really what’s going on.
I chose to start with text channels. I stubbed each text channel in a dedicated Terraform file, text_channels.tf:
Now we can import the existing config into the state (and link it to the resource) with the terraform import command. Each import operation takes the resource address as the first parameter, and an identifier as the second (here, the channel id). e.g.
However, this does not populate the resources in the Terraform files. We then need to examine the state OR push up the empty resources and allow GitLab to show us the diff. We can dump the state with terraform show:
# discord_text_channel.announcements:
resource "discord_text_channel" "announcements" {
    category                 = "XXX"
    id                       = "XXX"
    name                     = "announcements"
    nsfw                     = false
    position                 = 1
    server_id                = "XXX"
    sync_perms_with_category = false
    type                     = "text"
}
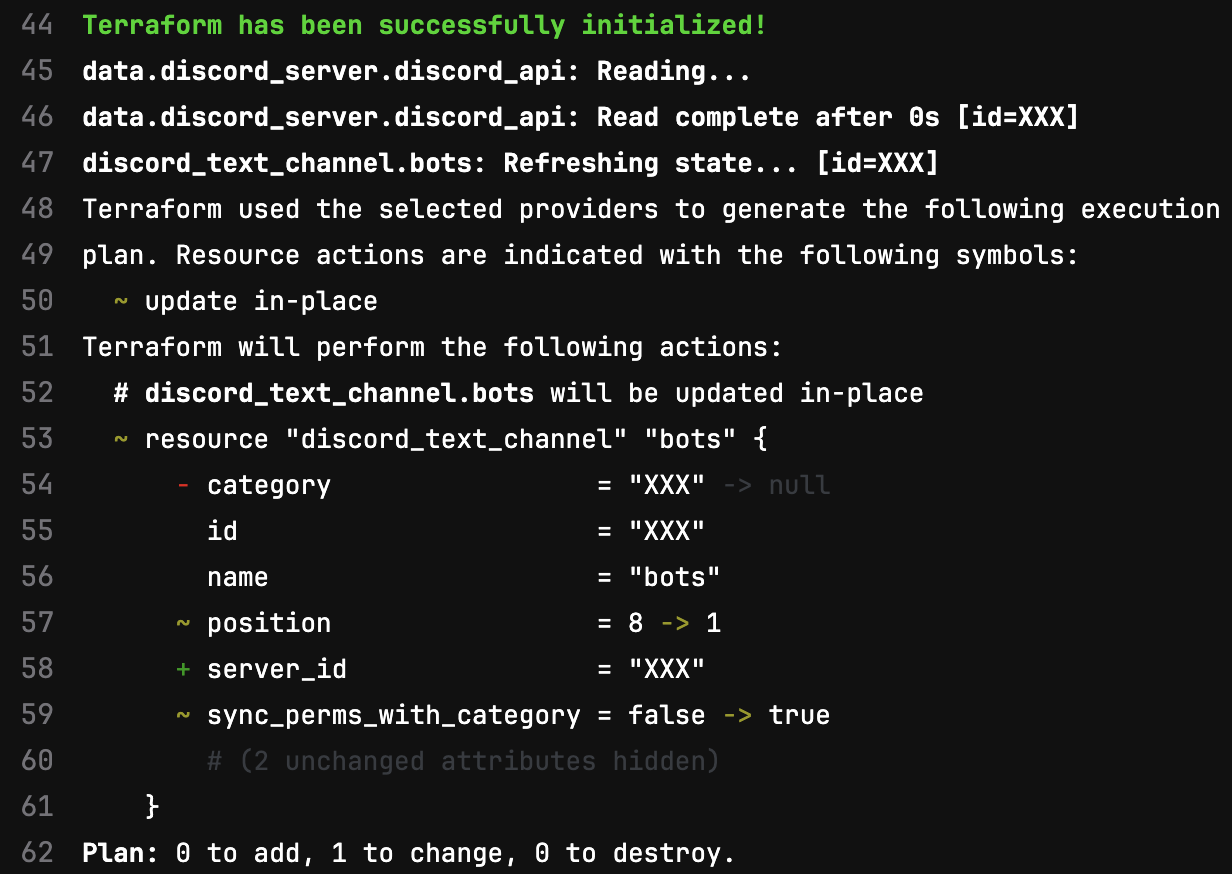
And simply copy the values into the relevant resources. However, this will include optional attributes with default values. I chose instead, to push the empty resources up and use GitLab to see which attributes were actually needed:
Subsequently, I’ve also now realised, this is simply the output of terraform plan, so I can run that locally to get the same feedback but more quickly and easily.
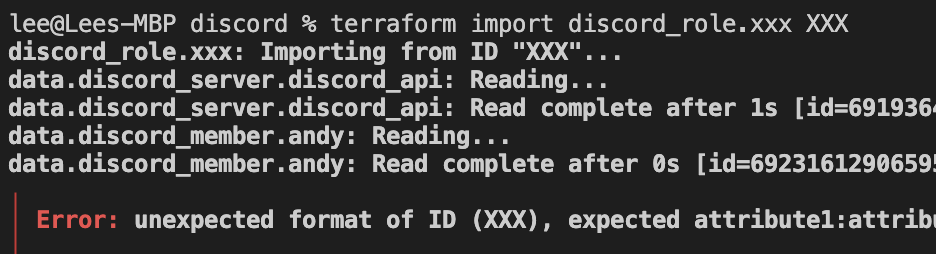
I was able to rinse and repeat this formula to dump and import all voice channels and text channels. Next it was time to get the roles. But trying to import roles using the role_id threw an error:
Fortunately, it was reasonably self explanatory/easy to guess. Switching the role_id for a composite id using server_id:role_id did the trick and now we have text_channels.tf:
resource "discord_text_channel" "welcome" {
  name                     = "welcome"
  server_id                = data.discord_server.discord_api.server_id
  category                 = "XXX"
  position                 = 0
  sync_perms_with_category = false
}

resource "discord_text_channel" "announcements" {
  name                     = "announcements"
  server_id                = data.discord_server.discord_api.server_id
  category                 = "XXX"
  position                 = 1
  sync_perms_with_category = false
}
resource "discord_role" "manager" {
  name        = "manager"
  server_id   = data.discord_server.discord_api.server_id
  color       = 10181046
  mentionable = true
  permissions = 7247232849
  position    = 0
}

resource "discord_role" "support" {
  name        = "support"
  server_id   = data.discord_server.discord_api.server_id
  color       = 15105570
  hoist       = true
  mentionable = true
  permissions = 865540234816
  position    = 1
}
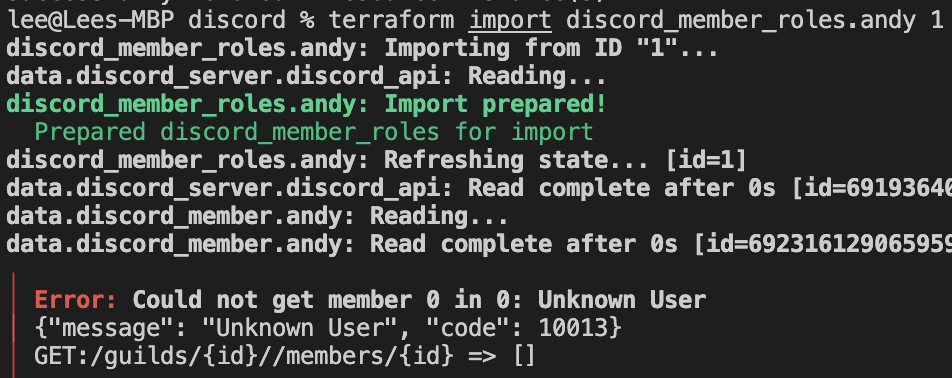
Next up, member roles (to give each user the relevant access). This time, another error:
Unfortunately, this time there wasn’t as helpful message, although the displayed API endpoint did suggest we might need a server_id and user_id, but switching to server_id:user_id didn’t help, and Terraform continued to identify the input as empty/0.
After some discussion with Patrick Rice (a maintainer of the Terraform provider for GitLab and all round community legend), it seems there is a bug or gap in the underlying functionality, so we’ll need to:
Patrick explained how I could modify the source and instruct terraform to use the local development, by creating a ~/.terraformrc file containing:
provider_installation {

  dev_overrides {
      "Lucky3028/discord" = "../../github/terraform-provider-discord/bin"
  }

  # For all other providers, install them directly from their origin provider
  # registries as normal. If you omit this, Terraform will _only_ use
  # the dev_overrides block, and so no other providers will be available.
  direct {}
}
After modifying the source, I ran: go build -o bin/terraform-provider-discord, then delete the .terraform folder and re-run the earlier terraform init command (obtained from the GitLab UI). We are now using the custom provider.
A frustrating limitation of the AWS Amplify platform: it can “plug straight in” to GitLab.com SaaS, but doesn’t have support for self managed yet. This issue is tracked https://github.com/aws-amplify/amplify-hosting/issues/14
Wanting to automate all of our deployments, I had to “find a way”.
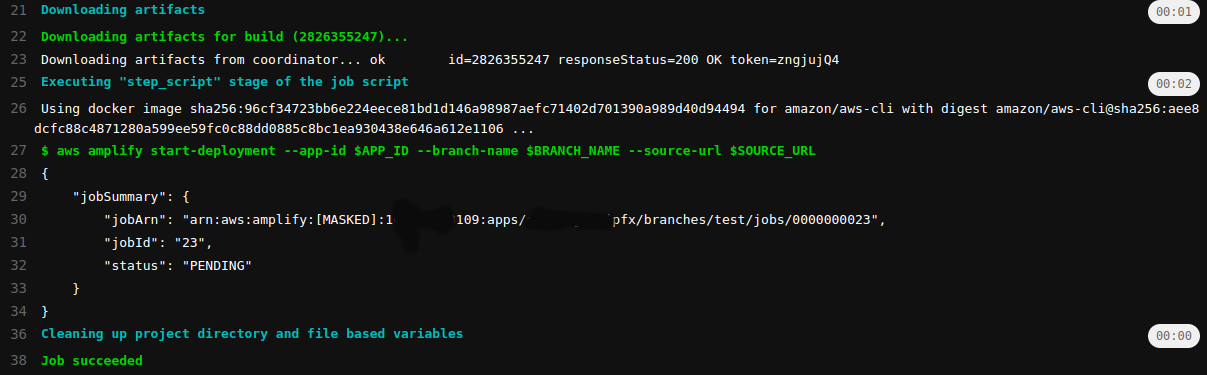
It took far longer than it should have because I tripped up and went down a few rabbit holes, but here’s the final, simple, working solution. This assumes you have created the app in the AWS console and just want to be able to deploy new releases.
You will need to replace REGION, ACCOUNT_ID and APP_ID with the relevant values. You can also go further and limit to a specific branch if desired.
You may wish to grant your user less restrictive permission (for example, if you want the same credentials to be used to deploy multiple apps).
Configure GitLab CI/CD Variables:
I chose to configure: AWS_ACCESS_KEY_ID, AWS_SECRET_ACCESS_KEY and AWS_REGION and set them to be protected and masked. You could also define your APP_ID and BRANCH_NAME here if you wanted to (instead we do it in the yaml below).
We have been transitioning from a GitLab runner on Windows Server 2016 (with a pre-configured/persisted environment) to a runner on Ubuntu 20.04 using throw-away/docker images.
Although we often use SQL Server, most of our recent development projects have been API based without the need for a database so we had avoided tackling this task until now.
Building the Database
Unfortunately the dotnet command isn’t capable of building SQL Server Database Projects. Fortunately, there’s an awesome project which can assist: https://github.com/rr-wfm/MSBuild.Sdk.SqlProj
I think it is possible to start with that project template and build the database entirely that way, however we opted to keep our standard SQL Server Database Project and use this as a layer on top.
That essentially involves configuring the solution to not build the SQL Server Database Project, then create a new project along the lines of:
So we can now build the .dac.pac and publish/deploy using our .gitlab-ci.yml but in order to run integration/end-to-end tests, we need to spin up a SQL Server in docker to host the database.
Google turned up some good resources which quickly got me up and running with mcr.microsoft.com/mssql/server:2019-latest
The only slight challenge I found the environment variables needed to pass to the service need to be defined in the .gitlab-ci.yml and can’t simply be defined in the GitLab UI. I have raised a merge request to improve the docs, and there is an open issue to track this behaviour (unsure if it’s a bug or intended).
Summary
So we’re not actually deploying this project using GitLab CI/CD, but for the build/test- our full .gitlab-ci.yml now looks like:
Note where we “redefine” SA_PASSWORD at the top as the CI variable defined in the GitLab UI is not available to services, but once “redefined” in the yaml it is.
We had one final tweak to our DbContext to tell it to grab the connection string from the environment variable if available, otherwise fall back to the standard connectoin string in the appsettings.json file (appsettings.
    public partial class DatabaseNameDbContext : DbContext
    {
        protected override void OnConfiguring(DbContextOptionsBuilder optionsBuilder)
        {
            optionsBuilder.UseSqlServer(Environment.GetEnvironmentVariable("SQL_CONNECTION_STRING") ?? Settings.DbConnectionString);
        }
    }
I have no doubt there are still numerous improvements to be made, but it feels like good progress on our end now the full environment can be spun up at a moments notice in docker.
We recently upgraded Android Studio and don’t seem to be able to generate signed APKs compatible with the Clover platform anymore. Fortunately this coincided nicely with a drive to leverage more GitLab CI / CD.
We previously migrated our Maven package repository to GitLab and this would probably have been the next logical step. Not only would it fix our immediate problem, but also lock down access to the keystore and reduce the manual effort required getting our local development environment setup and building the signed APKs.
For completeness, I’ve included a full example of our app/build.gradle, but only two additions were necessary:
The android -> signingConfigs section
The signingConfig signingConfigs.release line under android -> buildTypes -> release
Setting v1SigningEnabled to true and v2SigningEnabled to false is specific to the Clover platform. I suspect for most android platforms these settings can either be removed or both set true.
So far nothing too complex. Next we need to configure the keystore and build script in GitLab CI.
Initially I found a “standard” gradle docker image, but quickly realised it needed to be an image with the android SDK. cangol/android-gradle was one of the first google turned up and seems to work perfectly.
Now we need to get the keystore into a CI variable. Because it’s a binary file, base64 encoding it seemed like the simplest approach. In windows I used the following command:
I quickly found our master keystore (containing a number of signing keys) was too big, so each key was split into it’s own store (I used https://keystore-explorer.org/) – this is probably a good practice from a security standpoint anyway.
Adding the KEYSTORE_PASSWORD, KEYNAME, and KEY_PASSWORD didn’t require anything special, but now we need the CI script to:
Convert the KEYSTORE back to binary: base64 -d $KEYSTORE > /.keystore
Run the build: gradle assembleRelease
And extract the resulting .APK (see the artifact -> paths -> app-release.apk (the resulting GitLab artifact zip retained the folder structure, so extracting the APK initially involved navigating into app then build then outputs then apk then releases… I’m sure there must be a simpler approach, but you can see the workaround I used, which copies it to the root: cp app/build/outputs/apk/release/app-release.apk ./)
Until recently we were using Sonatype Nexus repository manager to host our maven packages and NuGet Server (http://nugetserver.net/) to host our NuGet packages.
Whilst they were working reasonably well, they were yet 2 more systems adding to our already bloated list of systems, so we were keen to drop them in favour of the “all singing, all dancing” GitLab.
On top of this, we were building and publishing the packages by hand. Now seemed like the ideal opportunity to start to use the integrated package repository in GitLab at the same time as scripting the build/publish using CI/CD.
We only have a dozen or so packages in each system, but we did anticipate it being a pretty big challenge.
The first decision we made was to have two projects- one to host NuGet packages, and one to host Maven packages.
Being a primarily Microsoft shop (and more in our comfort zone with C#), we decided to attack NuGet first…
$NUGET_CONFIG is a CI variable which was already in place for projects to consume NuGet packages, so it seemed more logical than using dotnet nuget add source...
You can see we opted to pull the URL, user and password/token all from CI rather than just the password.
This is the root build.gradle, so a there is a bit of duplication in the module/app build.gradle. I would love to make this a little bit more dynamic (pulling the artifact path, package name/version etc, but for now this works).
We consume the packages by adding the following to our build.gradle:
repositories {
    maven {
        name = 'GitLab'
        url = gidlabMavenUrl
        credentials(HttpHeaderCredentials) {
            name = gitlabMavenUser
            value = gitlabMavenToken
        }
        authentication {
            header(HttpHeaderAuthentication)
        }
    }
}
Then set the variables in our ~/.gradle/gradle.properties
Good luck, and if you have any suggestions, please shout!