Latest Entries »

This is still a work in progress, but every time I visit the topic I seem to hit a wall and forget what I previously learnt… so let’s do a quick brain dump from my latest attempt.

I decided to spin up my k8s cluster/node on a fresh Ubuntu 20.04 Server installation using k3s. At time of writing, GitLab only supports v1.19 and below (see https://docs.gitlab.com/ee/user/project/clusters/#supported-cluster-versions).

So first we use the following command to install k3s (I ran everything while sudo’d as root):

export INSTALL_K3S_VERSION=v1.19.8+k3s1
curl -sfL https://get.k3s.io | sh -

We can then setup the cluster in GitLab (Admin -> Kubernete -> Connect existing cluster). Name the cluster as you see fit, use https://k3s-host-ip:6443 for the API URL then grab the certificate by running:

kubectl config view --raw -o=jsonpath='{.clusters[0].cluster.certificate-authority-data}' | base64 --decode

And the service token by running:

cat <<EOF | kubectl apply -f -
apiVersion: v1
kind: ServiceAccount
metadata:
  name: gitlab-admin
  namespace: kube-system
---
apiVersion: rbac.authorization.k8s.io/v1
kind: ClusterRoleBinding
metadata:
  name: gitlab-admin
roleRef:
  apiGroup: rbac.authorization.k8s.io
  kind: ClusterRole
  name: cluster-admin
subjects:
- kind: ServiceAccount
  name: gitlab-admin
  namespace: kube-system
EOF
SECRET=$(kubectl -n kube-system get secret | grep gitlab-admin | awk '{print $1}')
TOKEN=$(kubectl -n kube-system get secret $SECRET -o jsonpath='{.data.token}' | base64 --decode)
echo $TOKEN

And hit “Add Kubernetes cluster”.

I had problems installing any of the applications (prometheus, ingress etc) but some research suggested installing MetalLB would help:

kubectl apply -f https://raw.githubusercontent.com/metallb/metallb/v0.9.5/manifests/namespace.yaml
kubectl apply -f https://raw.githubusercontent.com/metallb/metallb/v0.9.5/manifests/metallb.yaml
kubectl create secret generic -n metallb-system memberlist --from-literal=secretkey="$(openssl rand -base64 128)"
cat <<EOF | kubectl apply -f -
apiVersion: v1
kind: ConfigMap
metadata:
  namespace: metallb-system
  name: config
data:
  config: |
    address-pools:
    - name: default
      protocol: layer2
      addresses:
      - 192.168.99.1-192.168.99.100
EOF

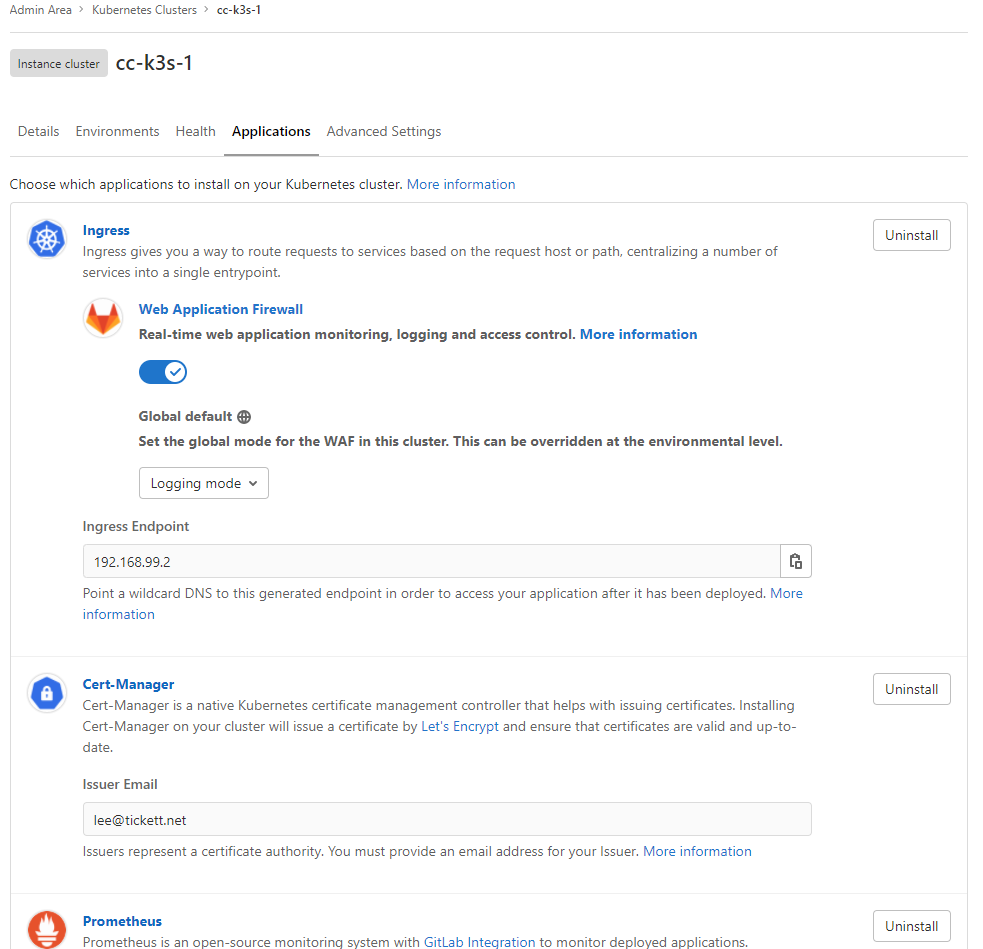
And bingo, we can now install the apps:

And check the health graphs etc:

I’m not sure whether I’ll be using k8s yet. But I do want to start using CD (currently only doing CI) and it feels like GitLab is built to play nice with it out of the box (along with Review Apps etc).

Props to the notes from: https://betterprogramming.pub/using-a-k3s-kubernetes-cluster-for-your-gitlab-project-b0b035c291a9 and https://gitlab.com/gitlab-org/gitlab/-/issues/214229 for pointing me in the right direction!

Good luck!

Yesterday I was faced with an error while trying to connect to a Windows 2016 Server hosed in AWS (EC2):

An internal error has occurred.

The only “change” that had been made recently was the installation of .NET Framework 4.8.

I found some articles pointing to possible solutions, but without access to the console it was going to prove difficult to diagnose and resolve!

My first port of call was checking the event log. Fortunately windows event viewer supports connecting to a remote computer:

When trying to establish a Remote Desktop Connection an error was appearing in the System log (coming from Schannel):

A fatal error occurred when attempting to access the TLS server credential private key. The error code returned from the cryptographic module is 0x8009030D. The internal error state is 10001.

Google found a few suggestions (including some changes to my local client registry) but no initial joy. Then I found this TechNet article which sounded a bit more promising: https://social.technet.microsoft.com/Forums/en-US/0d2da30b-4876-45c1-99d1-1e89a12c1e86/an-internal-error-has-ocurred-error-when-i-try-to-rdp-onto-a-2012-r2-server?forum=winserver8gen

The challenge was then figuring out how to apply this change remotely… Initially I didn’t even have the Group Policy Object Editor available on my machine (Windows 10 Home). But a quick script was able to add it:

dir /b %SystemRoot%\servicing\Packages\Microsoft-Windows-GroupPolicy-ClientExtensions-Package~3*.mum >List.txt 
dir /b %SystemRoot%\servicing\Packages\Microsoft-Windows-GroupPolicy-ClientTools-Package~3*.mum >>List.txt 

for /f %%i in ('findstr /i . List.txt 2^>nul') do dism /online /norestart /add-package:"%SystemRoot%\servicing\Packages\%%i" 
pause

You need to save the script with a .bat extension and run/execute. Great now we can launch the local policy editor, but no apparent option to connect to a remote computer!

Some more googling… great it looks like when using Microsoft Management Console (mmc) you can add the component and have the option to connect to a remote computer (there is also a command line argument):

gpedit.msc /gpcomputer:Computername

But damn, Access Denied and no prompt/option to enter credentials! Fortunately, I commonly need to launch applications (such as SQL Server Management Studio, Visual Studio etc) with remote credentials so I have a trick up my sleeve!

runas /netonly /user:remote-machine\username cmd

We now have a shell running with the remote administrator’s credentials. From here we can launch mmc or gpedit.msc and connect to the remote computer!

I was successfully able to change the remote policy. Under Computer Configuration, Administrative Templates, Windows Components, Remote Desktop Services, Remote Desktop Session Host, Security, set Require use of specific secuirty layer for remote (DGP) connections to Enabled and select RDP from the Security Layer options dropdown.

I wasn’t able to quickly find a way to execute gpupdate on the remote machine (I know I could have used something like psexec, but didn’t have that to hand), but was able to reboot the server gracefully simply by executing:

shutdown /r /m \\remote-machine /t 0

Voila! We’re back in business.

I think some of the credential issues could also been able averted by creating a user on my local computer with the same username/password as the remote administrator account. Then logging in to my local computer with that account.

Good luck!

Budget AWS S3 FTP Server

I’m baffled that S3 doesn’t support FTP (it looks like they offer a product for it, but it costs $100s/month. So set out to spin something up myself.

I used Turnkey “File Server” by https://aws.amazon.com/marketplace/pp/B01KVFNQUO?qid=1614180221721&sr=0-1&ref_=srh_res_product_title as a base (with a simple Webmin UI for managing users etc). This was setup on a t2.nano instance (1cpu, 0.5gb ram, 10gb gp2) costing approx. $35/yr.

Once the EC2 instance was up and running, I installed s3fs (https://github.com/s3fs-fuse/s3fs-fuse):

sudo apt install s3fs

Created a password file:

sudo echo ACCESS_KEY_ID:SECRET_ACCESS_KEY > /etc/.passwd-s3fs

Then setup a new systemd service (in Webmin via System -> Bootup and Shutdown):

[Unit]
Description=Mount Amazon S3 Bucket
Wants=network-online.target
After=network-online.target

[Service]
Type=oneshot
RemainAfterExit=yes
ExecStart=/usr/bin/s3fs bucket /mnt/s3 -o passwd_file=/etc/.passwd-s3fs -o allow_other -o umask=022
ExecStop=/bin/fusermount -u /mnt/s3

[Install]
WantedBy=multi-user.target

Note the -o allow_other and -o umask=022 this was vital to get things working!

Now to setup the chroot / sftp config. We start by tweaking .sshd_config (in Webmin via Servers -> SSH Server -> Edit Config Files). Comment out the line:

Subsystem sftp /usr/lib/openssh/sftp-server

And replace with:

Subsystem sftp internal-sftp

Then add the following section to the end:

Match group ftp
  ChrootDirectory /mnt/s3/home
  ForceCommand internal-sftp

Now create the ftp group and users in Webmin via System -> Users and Groups. Be sure to set the user shell to

/usr/sbin/nologin
so they can’t login via SSH!

It is important that the /mnt/s3/home folder is owned by root:root and chmod to 755

Then inside create a folder for each user owned by user:ftp and chmod to 755

I hope i’ve not missed any steps. This took a long time to piece together because of issues with chroot jail, folder permissions and s3fs mounting permissions.

Good luck!

This isn’t the firs time I’ve seen a diff like this, but is the first time I’ve taken the time to troubleshoot it.

So GitLab knows something has changed (hence showing a diff), but the diff shows no changes (+0 -0). If I check the old/new versions of the file I can clearly see differences:

And copying into vscode for compare:

So why is GitLab getting confused? A quick google for “gitlab misleading binary diff” turned up a few results pointing me in the right direction (talking about files being incorrectly identified as binary and issues with utf16 etc). So I decided it would be sensible to see how git sees the diff from the command-line:

Right, now we’re getting somewhere! So why does git thing it’s a binary file? Let’s take a look in VScode again…

Right, now we’re getting somehwere. And in a hex editor (HxD):

Yep- that’s definitely the problem. So how can we avoid this in future?

It looks like pre-receive-hooks would allow us to do exactly what we want (do some checks and reject a commit if certain criteria are/aren’t met). Now do I need to write a script to do this from scratch? Nope, it looks like someone has already beat me to it: https://gist.github.com/theirix/d644acd1446b461fbf6c

Worked perfectly pushing code:

But from the IDE/WebIDE it just failed without an error:

Again, a bit of googling turned up a few GitLab issues and some documentation which states messages need to be prefixed with either “GitLab:” or “GL-HOOK-ERR:“. Bingo!

I simplified the script a little, removed the beautiful ascii art and added UTF8-BOM handling and wildcards to the “binary” check (as Git was rejecting some file types like Crystal reports which have a mime-encoding of:

bitnami@debian:~$ file -b --mime-encoding crystal.rpt
application/x-rptbinary
#!/bin/bash

RESULT=0
while read oldrev newrev refname
do
  OLDIFS=$IFS
  IFS=$'\n'

  for FILE in `git diff-tree -r --name-only $oldrev..$newrev`
  do
    git cat-file -e $newrev:$FILE 2>/dev/null

    # checks only existing non-binary files only
    if [ "$?" = "0" ] && [[ "`git show $newrev:$FILE | file -b --mime-encoding - 2>/dev/null`" != *"binary"* ]] ; then
      # check if a file could be converted to the cp1251 (cyrillic one-byte encoding)
      git show $newrev:$FILE | sed $'s/\ufeff//g' | iconv -f utf-8 -t cp1251 > /dev/null

      if [ "$?" != "0" ] ; then
        echo "GitLab: File $FILE contains damaged unicode symbols" >&2
        RESULT=1
      fi
    fi
  done
  IFS=$OLDIFS
done
exit $RESULT

  1. Use the script from http://www.cron.dk/easy-certificate-generation-for-openvpn/ to create the keys/certificates etc (attached in case the link is no longer valid):

I think I had to chmod +x to make the file executable, and possibly sudo -i to elevate permissions (and of course replace all of the placeholders with my desired values).

2. Enter configuration mode and add the following entries (or do it through the UI);

set interfaces openvpn vtun0 mode server
set interfaces openvpn vtun0 server subnet 10.100.10.0/24
set interfaces openvpn vtun0 server push-route 10.10.10.10/24
set interfaces openvpn vtun0 server name-server 10.10.10.10
set interfaces openvpn vtun0 tls ca-cert-file /config/openvpn/ca.pem
set interfaces openvpn vtun0 tls cert-file /config/openvpn/tickett.net.crt
set interfaces openvpn vtun0 tls key-file /config/openvpn/tickett.net.key
set interfaces openvpn vtun0 tls dh-file /config/openvpn/dh.pem

set service dns forwarding listen-on vtun0
set firewall name WAN_LOCAL rule 60 action accept
set firewall name WAN_LOCAL rule 60 description openvpn
set firewall name WAN_LOCAL rule 60 destination port 1194
set firewall name WAN_LOCAL rule 60 protocol udp

You will need to change the;

  • server subnet you want to be used by the VPN clients
  • the push-route (ip ranges) you want the VPN clients to have access to
  • the name-server (most likely the ip of the router itself)- make sure this is within one of the ip ranges you previously set
  • you may also need to change the rule id (from 60) if that rule is already in use

At this point you should be able to download the .ovpn file to a client and connect (using solely the certificate for authentication).

That’s the easy bit, now let’s tackle the tricky bit!

3. Login to https://portal.azure.com/ and select Azure Active Directory, App Registrations then New Registration.

From the Authentication tab enable the “Treat application as a public client” option.

From the API Permissions tab click Add Permission and select Azure Active Directory Graph from the bottom (Supported legacy APIs) section then Directory.Read.All.

4. Download my modified version of openvpn-azure-ad-auth.py from https://github.com/ltickett/openvpn-azure-ad-auth/blob/master/openvpn-azure-ad-auth.py to /config/openvpn

5. Create /config/openvpn/openvpn-azure-ad-auth.yaml following the instructions in README.md)- I strongly recommend NOT enabling token_cache as it allowed me to connect to the VPN without a password in certain scenarios.

6. Add the debian repositories to package manager;

set system package repository stretch components 'main contrib non-free'
set system package repository stretch distribution stretch
set system package repository stretch url http://http.us.debian.org/debian

The install the prerequisites by running;

sudo apt-get update
sudo apt-get install python-pyparsing
sudo apt-get install python-six
sudo apt-get install python-appdirs
sudo apt-get install python-yaml
sudo apt-get install python-requests
sudo apt-get install python-adal
sudo apt-get install python-pbkdf2

Activate the script by running;

./openvpn-azure-ad-auth.py --consent

And follow the on-screen instructions.

7. Finally tweak the EdgeRouter config to use the python script;

set interfaces openvpn vtun0 openvpn-option "--duplicate-cn"
set interfaces openvpn vtun0 openvpn-option "--auth-user-pass-verify /config/openvpn/openvpn-azure-ad-auth.py via-env"
set interfaces openvpn vtun0 openvpn-option "--script-security 3"

And you should be good to go!

If you experience any issues later, set the log_level to debug and check /config/openvpn/openvpn-azure-ad-auth.log (you can also try issuing show log | grep openvpn)

We went through the pain a few years back of getting this working in slapd.conf on DSM5 but needed to configure recently on DSM6 (which now uses cn=config). It took a while to crack but is really simple now we know how!

Install Directory Server from the Package Center on every node

Launch Directory Server and configure the basic settings on every node;

(I would suggest checking the “Disallow anonymous binds” option under “Connection Settings”);

From the control panel, select the Domain/LDAP option and check “Enable LDAP Client” on the LDAP tab. Enter localhost as the server address, SSL for encryption and the BaseDN from the Directory Server settings screen then click Apply.

Now use JXplorer (or your LDAP tool of choice) to connect to the cn=config database (again, you will need to repeat this step for every node);

You should see something like;

Switch to Table Editor, right click olcSyncrepl and chose “Add another value”. Then you need to paste;

{1}rid=002 provider=ldap://dnsname.synology.me:12345 bindmethod=simple timeout=0 network-timeout=0 binddn="uid=root,cn=users,dc=tick,dc=home" credentials="password123" keepalive=0:0:0 starttls=no filter="(objectclass=*)" searchbase="dc=tick,dc=home" scope=sub schemachecking=off type=refreshAndPersist retry="60 +"

You will need to replace;

  • the provider (depending on whether you are using a VPN, have a static IP etc)
  • the binddn (you will find this on the main screen of the Directory Server app as per my earlier screenshot)
  • the credentials (this is the password you configured when configuring the Directory Server earlier)
  • the searchbase (you will find this on the main screen of the Directory Server app as per my earlier screenshot)

Then locate olcMirrorMode and click into the value column and select True;

If you have more than 2 nodes in your n-way multi-master replication “cluster” you will need to add an additional olcSyncrepl entry for each node (be sure to increment the {1} and 002.

That’s it (I rebooted for good measure). Now try creating a user on each node and check it appears on your other nodes.

If you experience any issues your best bet is probably checking /var/log/messages

Good luck!

Whilst documentation/guides/info around GitLab CI on Linux, using Docker and working with languages such as Ruby seems forthcoming, I found little on .NET and Windows. So after spending a lot of time getting it working I wanted to share.

I have deployed a new, clean GitLab CE virtual machine and Windows 10 Professional virtual machine for the purposes of this post. You will need to either load a valid SSL certificate or use HTTP (there is plenty of information online around configuring either way).

The first thing is to download the 64bit Windows GitLab Runner 
from https://docs.gitlab.com/runner/install/windows.html. I chose to create a folder C:\GitLab-Runner to try and keep everything in one place. Then follow the instructions to register and install as a service (when prompted to enter the executor, enter shell).

Now let’s take a look at my .gitlab-ci.yml template;

stages:
  - build
  - test

variables:
  CI_DEBUG_TRACE: "false"

build:
 stage: build
 script:
  - 'call c:\gitlab-runner\build_script.bat'
 artifacts:
  paths:
   - Tests/bin/

test:
 stage: test
 script:
  - 'call c:\gitlab-runner\test_script.bat' 
 coverage: '/\(\d+\.\d+\)/'
 dependencies:
  - build
 artifacts:
  reports:
   junit: testresult.xml

There are a few points to note;

  • The order of the stages- it seemed odd to me at first, but the build needs to happen before the test
  • CI_DEBUG_TRACE could be omitted, but if anything doesn’t work it provides a nice way to troubleshoot
  • For both the build and test we call an external batch file- this makes it really simple/easy to change our CI by modifying a central script rather than going into every project and modifying the .yml (if we do have any special cases we can modify the .yml directly)
  • The build artifacts (we need the test binaries which include all of the compiled references)
  • The test artifacts

Now let’s look at our build_script.bat;

C:\Windows\Microsoft.NET\Framework\v4.0.30319\nuget restore
"C:\Program Files (x86)\Microsoft Visual Studio\2017\BuildTools\MSBuild\15.0\bin\msbuild" /t:Restore,Clean,ReBuild /p:Configuration=Debug;Platform="Any CPU"
"C:\Program Files (x86)\Microsoft Visual Studio\2017\BuildTools\MSBuild\15.0\bin\msbuild" /t:ReBuild /p:Configuration=Release;Platform="Any CPU"
ping 192.168.99.99 -n 1 -w 10000 2>nul || type nul>nul

To work, our .sln must sit in the root of the repository. There are essentially 3 steps;

  • Restore all nuget packages
  • Attempt to build using the debug config
  • Attempt to build using the release config
  • Wait for 10 seconds (without this some files become locked and cause the test stage to fail)

We also have a private NuGet server which needs adding for the user the GitLab runner service is executing as (SYSTEM here), so we enter this line for the first execution then it can be removed straight away;

C:\Windows\Microsoft.NET\Framework\v4.0.30319\nuget sources add -Name "Tickett Enterprises Limited" -Source https://nuget.blah.com:1234/nuget -username "svc-blah" -password "password123"

And our test_script.bat;

c:\GitLab-Runner\opencover\OpenCover.Console.exe -returntargetcode:1000 -register -target:"C:\Program Files (x86)\NUnit.org\nunit-console\nunit3-console.exe" -targetargs:"Tests\Tests.csproj --result=testresult.xml;transform=C:\gitlab-runner\nunit3-junit.xslt"

To work, our test project must be called Tests.csproj and reside in a folder named Tests. The entire script is combined into a single step which;

  • Uses OpenCover to
  • Execute our tests using nunit3
  • Ensures any error returned by nunit3 is in turn returned by OpenCover
  • Transforms nunit3’s output into a format which GitLab can interpret

So the last piece of the puzzle is the xslt template used to transform the nunit output into something GitLab can understand; you can find this
https://github.com/nunit/nunit-transforms/tree/master/nunit3-junit

If we were to run our CI pipeline now it would fail because none of the prerequisites have been installed on the machine with the runner.

So let’s go ahead and download and install git
https://git-scm.com/download/win (I went with most of the defaults and selected C:\Windows\notepad.exe as the default editor as we won’t really be using it anyway). I’m sure there is a more minimal install we could do, but this works.

You also need to launch a command prompt and run;

git lfs install --system

Next we need to install nuget- the windows binary can be downloaded from
https://www.nuget.org/downloads (and we decided to place it in C:\Windows\Microsoft.NET\Framework\v4.0.30319).

Now we need the Visual Studio 2017 build tools (currently available at
https://my.visualstudio.com/Downloads?q=visual%20studio%202017&wt.mc_id=o~msft~vscom~older-downloads or
https://visualstudio.microsoft.com/thank-you-downloading-visual-studio/?sku=BuildTools&rel=15&src=myvs although I know Microsoft have a nasty habit of breaking old links).

You should be able to run the installation and select the “workloads” (or components) relevant to you; we use .NET desktop build tools, Web development build tools and Data storage and processing build tools. We also need to install .NET Framework 4.7 SDK/targeting pack (from the individual components tab).

Right- let’s give it another run and see how we’re getting on;

Excellent, our build is now working AOK, we can focus on the tests. Let’s start by downloading OpenCover from
https://github.com/OpenCover/opencover/releases (at time of writing the latest release is 4.7.922). I chose the .zip archive and simply extracted it to C:\GitLab-Runner\opencover

And now we install NUnit Console from
https://github.com/nunit/nunit-console/releases (at time of writing the latest release is 3.10.0). I chose the .msi and installed using the defaults.

And now if we try and run our pipeline again;

Bingo! We can see the build and test stages both passed and our test shows a result for code coverage! Now let’s check what happens if we deliberately break a test;

Perfect! This time we can see the pipeline has failed and if we raise a merge request the summary summary indicated 1 test failed out of 33 total and highlights the failed test.

The final little nicety we added a few badges to our projects (I did this this via the groups so they appear for all projects within the group rather than adding them to each project).

Go to Groups -> Settings -> General -> Badges then add;

https://yourgitlaburl.com/%{project_path}/badges/
%{default_branch}/pipeline.svg and https://yourgitlaburl.com/%{project_path}/badges/ %{default_branch}/coverage.svg (you can link them to wherever you like). I am curious to find out a little more about badges, I would quite like to show the master, test and development branch pipeline and test coverage badges all on the project but I’ve yet to figure out if you can pass a parameter to change the badge label.

I suspect the next steps will be to;

  • Add some form of code style/best practice analysis
  • Start thinking about deployment (this could be tricky as it involves a lot of differents ifs, buts and maybes along with VPNS, domain users etc)

Any questions, please shout- me or my team would be happy to help you get up and running!

GitLab Setup : Summary

We have now been using GitLab CE (self hosted) for about 16 months and have made some good progress. I hope to post a short series of blog entries describing how we got GitLab setup to work for us in a predominantly Microsoft .NET development environment.

In this initial post I hope to summarise what we have acheived which I can then detail “how-to” in subsequent posts. I will probably spin up a new test instance to run through and ensure the steps are accurate (a lot of them were trial and error the first time round).

I may not go into detail on these ones as they are completely bespoke solutions- but if you are interested post a comment and I will try and do a write up;

  • Merge request approvals
  • Project “templates”
  • Global search across all projects and branches
  • Webhooks/integration with our helpdesk

Watch this space!

Many corporate laptops come with a Microsoft Windows license. Often the serial / key is embedded in the BIOS so if/when you format/re-install it will be automatically licensed/activated.

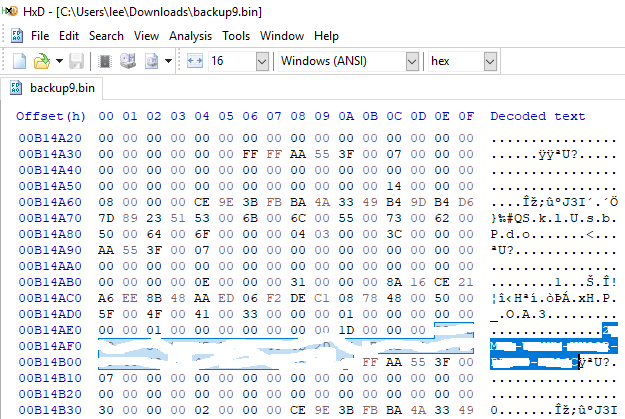
I had a few dead HP Probooks I needed to retrieve the license key from; I was able to dump the BIOS (see notes on an earlier blog entry https://tickett.wordpress.com/2018/08/26/unlock-remove-hp-probook-430-g3-bios-password-part-2/) then it was a case of scanning through lots and lots of garbage to find what looked like a valid serial. I eventually found it around address 00B14AE0;

bios

SSRS 2016 Error when using HTTPS

My first surprise, I couldn’t simply enable HTTPS on the Web Portal (in Reporting Services Configuration Manager). Straight away this causes an error when trying to access https://host.domain/reports

The service is not available.

The report server isnā€™t configured properly. Contact your system administrator to resolve the issue. System administrators: The report server Web Portal URLs and Web Service URLs donā€™t match. Use Reporting Services Configuration Manager to configure the URLs and ensure they match.

Seemingly behind the scenes the web portal is communicating with the web service (and it doesn’t know to use a different URL), so this also needs configuring for HTTPS. After setting this up, I can hit the basic web portal pages but if I try and view my subscriptions for example I receive an error;

Not overly helpful, and doing some snooping in Chrome Developer Tools simply shows the HTTP request returning a 500 error.

There is nothing in the event log on the SSRS server, but there are a few lengthy error messages in the reporting services log files;

Microsoft.ReportingServices.Portal.WebHost!reportserverwebapp!6!09/04/2018-07:59:37:: e ERROR: [m9yd0rtt]: OData exception occurred: System.Net.WebException: The underlying connection was closed: Could not establish trust relationship for the SSL/TLS secure channel. ---> System.Security.Authentication.AuthenticationException: The remote certificate is invalid according to the validation procedure.
at System.Net.Security.SslState.StartSendAuthResetSignal(ProtocolToken message, AsyncProtocolRequest asyncRequest, Exception exception)
at System.Net.Security.SslState.CheckCompletionBeforeNextReceive(ProtocolToken message, AsyncProtocolRequest asyncRequest)
at System.Net.Security.SslState.ProcessReceivedBlob(Byte[] buffer, Int32 count, AsyncProtocolRequest asyncRequest)
at System.Net.Security.SslState.StartReceiveBlob(Byte[] buffer, AsyncProtocolRequest asyncRequest)
at System.Net.Security.SslState.CheckCompletionBeforeNextReceive(ProtocolToken message, AsyncProtocolRequest asyncRequest)
at System.Net.Security.SslState.ForceAuthentication(Boolean receiveFirst, Byte[] buffer, AsyncProtocolRequest asyncRequest)
at System.Net.Security.SslState.ProcessAuthentication(LazyAsyncResult lazyResult)
at System.Threading.ExecutionContext.RunInternal(ExecutionContext executionContext, ContextCallback callback, Object state, Boolean preserveSyncCtx)
at System.Threading.ExecutionContext.Run(ExecutionContext executionContext, ContextCallback callback, Object state, Boolean preserveSyncCtx)
at System.Threading.ExecutionContext.Run(ExecutionContext executionContext, ContextCallback callback, Object state)
at System.Net.TlsStream.ProcessAuthentication(LazyAsyncResult result)
at System.Net.TlsStream.Write(Byte[] buffer, Int32 offset, Int32 size)
at System.Net.ConnectStream.WriteHeaders(Boolean async)
--- End of inner exception stack trace ---
at System.Web.Services.Protocols.WebClientProtocol.GetWebResponse(WebRequest request)
at System.Web.Services.Protocols.HttpWebClientProtocol.GetWebResponse(WebRequest request)
at System.Web.Services.Protocols.SoapHttpClientProtocol.Invoke(String methodName, Object[] parameters)
at Microsoft.SqlServer.ReportingServices2010.ReportingService2010.ListExtensions(String ExtensionType)
at Microsoft.SqlServer.ReportingServices2010.RSConnection2010.<>c__DisplayClass75.<ListExtensions>b__74()
at Microsoft.SqlServer.ReportingServices2010.RSConnection2010.SoapMethodWrapper`1.ExecuteMethod(Boolean setConnectionProtocol)
at Microsoft.SqlServer.ReportingServices2010.RSConnection2010.SoapMethodWrapper`1.ExecuteMethod()
at Microsoft.SqlServer.ReportingServices2010.RSConnection2010.ListExtensions(String extensionType)
at Microsoft.ReportingServices.Portal.Services.SoapProxy.SoapRS2010Proxy.<>c__DisplayClass41.<ListExtensions>b__40()
at Microsoft.ReportingServices.Portal.Services.SoapProxy.SoapAuthenticationHelper.ExecuteWithWindowsAuth[TReturn](SoapHttpClientProtocol soapClient, IPrincipal userPrincipal, Func`1 func)
at Microsoft.ReportingServices.Portal.Services.SoapProxy.SoapAuthenticationHelper.ExecuteWithCorrespondingAuthMechanism[TReturn](SoapHttpClientProtocol soapClient, IPrincipal userPrincipal, Func`1 func)
at Microsoft.ReportingServices.Portal.Services.SoapProxy.SoapRS2010Proxy.ListExtensions(IPrincipal userPrincipal, String extensionType)
at Microsoft.ReportingServices.Portal.Repositories.SystemService.ListExtensions(IPrincipal userPrincipal, ExtensionType extensionType)
at Microsoft.ReportingServices.Portal.Repositories.SystemService.PopulateLocalizedExtensionNames(IPrincipal userPrincipal, List`1 subscriptions)
at Microsoft.ReportingServices.Portal.ODataWebApi.V1.Controllers.SubscriptionsController.GetEntitySet(String castName)
at Microsoft.ReportingServices.Portal.ODataWebApi.V1.Controllers.Reflection.EntitySetReflectionODataController`1.GetRoot(ODataPath oDataPath, Int32& index)
at Microsoft.ReportingServices.Portal.ODataWebApi.V1.Controllers.Reflection.ReflectionODataController`1.Get(ODataPath oDataPath)
at lambda_method(Closure , Object , Object[] )
at System.Web.Http.Controllers.ReflectedHttpActionDescriptor.ActionExecutor.<>c__DisplayClass10.<GetExecutor>b__9(Object instance, Object[] methodParameters)
at System.Web.Http.Controllers.ReflectedHttpActionDescriptor.ExecuteAsync(HttpControllerContext controllerContext, IDictionary`2 arguments, CancellationToken cancellationToken)
--- End of stack trace from previous location where exception was thrown ---
at System.Runtime.ExceptionServices.ExceptionDispatchInfo.Throw()
at System.Runtime.CompilerServices.TaskAwaiter.HandleNonSuccessAndDebuggerNotification(Task task)
at System.Web.Http.Controllers.ApiControllerActionInvoker.<InvokeActionAsyncCore>d__0.MoveNext()
--- End of stack trace from previous location where exception was thrown ---
at System.Runtime.ExceptionServices.ExceptionDispatchInfo.Throw()
at System.Runtime.CompilerServices.TaskAwaiter.HandleNonSuccessAndDebuggerNotification(Task task)
at System.Web.Http.Filters.ActionFilterAttribute.<CallOnActionExecutedAsync>d__5.MoveNext()
--- End of stack trace from previous location where exception was thrown ---
at System.Runtime.ExceptionServices.ExceptionDispatchInfo.Throw()
at System.Web.Http.Filters.ActionFilterAttribute.<CallOnActionExecutedAsync>d__5.MoveNext()
--- End of stack trace from previous location where exception was thrown ---
at System.Runtime.ExceptionServices.ExceptionDispatchInfo.Throw()
at System.Runtime.CompilerServices.TaskAwaiter.HandleNonSuccessAndDebuggerNotification(Task task)
at System.Web.Http.Filters.ActionFilterAttribute.<ExecuteActionFilterAsyncCore>d__0.MoveNext()
--- End of stack trace from previous location where exception was thrown ---
at System.Runtime.ExceptionServices.ExceptionDispatchInfo.Throw()
at System.Runtime.CompilerServices.TaskAwaiter.HandleNonSuccessAndDebuggerNotification(Task task)
at System.Web.Http.Controllers.ActionFilterResult.<ExecuteAsync>d__2.MoveNext()
--- End of stack trace from previous location where exception was thrown ---
at System.Runtime.ExceptionServices.ExceptionDispatchInfo.Throw()
at System.Runtime.CompilerServices.TaskAwaiter.HandleNonSuccessAndDebuggerNotification(Task task)
at System.Web.Http.Controllers.ExceptionFilterResult.<ExecuteAsync>d__0.MoveNext().

Microsoft.ReportingServices.Portal.WebHost!reportserverwebapp!18!09/04/2018-08:00:58:: e ERROR: [dq2umtxh]: OData exception occurred: System.Net.WebException: The underlying connection was closed: Could not establish trust relationship for the SSL/TLS secure channel. ---> System.Security.Authentication.AuthenticationException: The remote certificate is invalid according to the validation procedure.
at System.Net.Security.SslState.StartSendAuthResetSignal(ProtocolToken message, AsyncProtocolRequest asyncRequest, Exception exception)
at System.Net.Security.SslState.CheckCompletionBeforeNextReceive(ProtocolToken message, AsyncProtocolRequest asyncRequest)
at System.Net.Security.SslState.ProcessReceivedBlob(Byte[] buffer, Int32 count, AsyncProtocolRequest asyncRequest)
at System.Net.Security.SslState.StartReceiveBlob(Byte[] buffer, AsyncProtocolRequest asyncRequest)
at System.Net.Security.SslState.CheckCompletionBeforeNextReceive(ProtocolToken message, AsyncProtocolRequest asyncRequest)
at System.Net.Security.SslState.ProcessReceivedBlob(Byte[] buffer, Int32 count, AsyncProtocolRequest asyncRequest)
at System.Net.Security.SslState.StartReceiveBlob(Byte[] buffer, AsyncProtocolRequest asyncRequest)
at System.Net.Security.SslState.CheckCompletionBeforeNextReceive(ProtocolToken message, AsyncProtocolRequest asyncRequest)
at System.Net.Security.SslState.ProcessReceivedBlob(Byte[] buffer, Int32 count, AsyncProtocolRequest asyncRequest)
at System.Net.Security.SslState.StartReceiveBlob(Byte[] buffer, AsyncProtocolRequest asyncRequest)
at System.Net.Security.SslState.CheckCompletionBeforeNextReceive(ProtocolToken message, AsyncProtocolRequest asyncRequest)
at System.Net.Security.SslState.ForceAuthentication(Boolean receiveFirst, Byte[] buffer, AsyncProtocolRequest asyncRequest)
at System.Net.Security.SslState.ProcessAuthentication(LazyAsyncResult lazyResult)
at System.Threading.ExecutionContext.RunInternal(ExecutionContext executionContext, ContextCallback callback, Object state, Boolean preserveSyncCtx)
at System.Threading.ExecutionContext.Run(ExecutionContext executionContext, ContextCallback callback, Object state, Boolean preserveSyncCtx)
at System.Threading.ExecutionContext.Run(ExecutionContext executionContext, ContextCallback callback, Object state)
at System.Net.TlsStream.ProcessAuthentication(LazyAsyncResult result)
at System.Net.TlsStream.Write(Byte[] buffer, Int32 offset, Int32 size)
at System.Net.ConnectStream.WriteHeaders(Boolean async)
--- End of inner exception stack trace ---
at System.Web.Services.Protocols.WebClientProtocol.GetWebResponse(WebRequest request)
at System.Web.Services.Protocols.HttpWebClientProtocol.GetWebResponse(WebRequest request)
at System.Web.Services.Protocols.SoapHttpClientProtocol.Invoke(String methodName, Object[] parameters)
at Microsoft.SqlServer.ReportingServices2010.ReportingService2010.ListExtensions(String ExtensionType)
at Microsoft.SqlServer.ReportingServices2010.RSConnection2010.<>c__DisplayClass75.<ListExtensions>b__74()
at Microsoft.SqlServer.ReportingServices2010.RSConnection2010.SoapMethodWrapper`1.ExecuteMethod(Boolean setConnectionProtocol)
at Microsoft.SqlServer.ReportingServices2010.RSConnection2010.SoapMethodWrapper`1.ExecuteMethod()
at Microsoft.SqlServer.ReportingServices2010.RSConnection2010.ListExtensions(String extensionType)
at Microsoft.ReportingServices.Portal.Services.SoapProxy.SoapRS2010Proxy.<>c__DisplayClass41.<ListExtensions>b__40()
at Microsoft.ReportingServices.Portal.Services.SoapProxy.SoapAuthenticationHelper.ExecuteWithWindowsAuth[TReturn](SoapHttpClientProtocol soapClient, IPrincipal userPrincipal, Func`1 func)
at Microsoft.ReportingServices.Portal.Services.SoapProxy.SoapAuthenticationHelper.ExecuteWithCorrespondingAuthMechanism[TReturn](SoapHttpClientProtocol soapClient, IPrincipal userPrincipal, Func`1 func)
at Microsoft.ReportingServices.Portal.Services.SoapProxy.SoapRS2010Proxy.ListExtensions(IPrincipal userPrincipal, String extensionType)
at Microsoft.ReportingServices.Portal.Repositories.SystemService.ListExtensions(IPrincipal userPrincipal, ExtensionType extensionType)
at Microsoft.ReportingServices.Portal.Repositories.SystemService.PopulateLocalizedExtensionNames(IPrincipal userPrincipal, List`1 subscriptions)
at Microsoft.ReportingServices.Portal.ODataWebApi.V1.Controllers.SubscriptionsController.GetEntitySet(String castName)
at Microsoft.ReportingServices.Portal.ODataWebApi.V1.Controllers.Reflection.EntitySetReflectionODataController`1.GetRoot(ODataPath oDataPath, Int32& index)
at Microsoft.ReportingServices.Portal.ODataWebApi.V1.Controllers.Reflection.ReflectionODataController`1.Get(ODataPath oDataPath)
at lambda_method(Closure , Object , Object[] )
at System.Web.Http.Controllers.ReflectedHttpActionDescriptor.ActionExecutor.<>c__DisplayClass10.<GetExecutor>b__9(Object instance, Object[] methodParameters)
at System.Web.Http.Controllers.ReflectedHttpActionDescriptor.ExecuteAsync(HttpControllerContext controllerContext, IDictionary`2 arguments, CancellationToken cancellationToken)
--- End of stack trace from previous location where exception was thrown ---
at System.Runtime.ExceptionServices.ExceptionDispatchInfo.Throw()
at System.Runtime.CompilerServices.TaskAwaiter.HandleNonSuccessAndDebuggerNotification(Task task)
at System.Web.Http.Controllers.ApiControllerActionInvoker.<InvokeActionAsyncCore>d__0.MoveNext()
--- End of stack trace from previous location where exception was thrown ---
at System.Runtime.ExceptionServices.ExceptionDispatchInfo.Throw()
at System.Runtime.CompilerServices.TaskAwaiter.HandleNonSuccessAndDebuggerNotification(Task task)
at System.Web.Http.Filters.ActionFilterAttribute.<CallOnActionExecutedAsync>d__5.MoveNext()
--- End of stack trace from previous location where exception was thrown ---
at System.Runtime.ExceptionServices.ExceptionDispatchInfo.Throw()
at System.Web.Http.Filters.ActionFilterAttribute.<CallOnActionExecutedAsync>d__5.MoveNext()
--- End of stack trace from previous location where exception was thrown ---
at System.Runtime.ExceptionServices.ExceptionDispatchInfo.Throw()
at System.Runtime.CompilerServices.TaskAwaiter.HandleNonSuccessAndDebuggerNotification(Task task)
at System.Web.Http.Filters.ActionFilterAttribute.<ExecuteActionFilterAsyncCore>d__0.MoveNext()
--- End of stack trace from previous location where exception was thrown ---
at System.Runtime.ExceptionServices.ExceptionDispatchInfo.Throw()
at System.Runtime.CompilerServices.TaskAwaiter.HandleNonSuccessAndDebuggerNotification(Task task)
at System.Web.Http.Controllers.ActionFilterResult.<ExecuteAsync>d__2.MoveNext()
--- End of stack trace from previous location where exception was thrown ---
at System.Runtime.ExceptionServices.ExceptionDispatchInfo.Throw()
at System.Runtime.CompilerServices.TaskAwaiter.HandleNonSuccessAndDebuggerNotification(Task task)
at System.Web.Http.Controllers.ExceptionFilterResult.<ExecuteAsync>d__0.MoveNext().

Something is moaning about trust/SSL. I am using a valid wildcard certificate and don’t see any certificate related errors in the browser.

Digging around, google seems to suggest changing the “SecureConnectionLevel” parameter in rsreportserver.config to a 0, but it was already set to 0 on my server. This didn’t help.

In the end, I was able to resolve the issue by setting “SecureConnectionLevel” to 3 and adding the fully qualified server/domain name (FQDN) in the “UrlRoot” parameter (i.e. toĀ https://host.domain) then restarting the service (either in Reporting Services Configuration Manager or Windows Service Manager).

Hope it works for you!